Decentralization is a lie. The way you hear it the first time it's not what it seems.
Decentralization is both philosophy and a term to say that a system doesn't need a third party between user and the system itself.
What you need to understand is, no matter what the % of decentralization of a system is, if there is a central point of failure or something centralized in the core logic of the system, the whole system is not decentralized.
I've learned this when the validators shut down the whole BSC after the hub bridge hack. It was a nice move but hey... for some hours i lost technically everything. That's fucking scary man.
This guide will show you how to create, host and configure your own backend for your web3 project. Keep in mind this will make your project centralized and it will change the risk-ratio of your investors. Be transparent about that.
Is a centralized system needed in web3?
depends on the project. Is this bad? No. It's a way to host a service.
We will use:
- api server to handle the data
- database to store data
- virtual machine to execute the software
- reverse proxy to secure endpoints and manage routes
- cloudflare to protect our endpoint
In this guide i'll use Windows as operative system to develop the backend, Debian to host it
Let's start by installing python! q: Why python? a: Python is easy to read & powerful q: Why FastApi? a: Robust framework to develop web services
https://www.python.org/
Remember to check "Add python.exe to PATH" so you can use it in the console

Once the installation is done, create a new folder called "backend_api"

I'm gonna show you how applications talk with you.
And how you talk to applications.
Enter in that folder and open the folder with VSCode
I like to split the editor like this, you're free to display the console where you want
I suggest to create a virtual environment for each project.
You can let some projects share the same venv if they use the same libraries.
To create one, install "virtualenv" if you don't have it yet with
pip install virtualenv
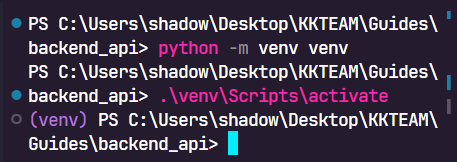
Then create a virtual environment with
python -m venv venv
Once the venv is created, activate it with
.\venv\Scripts\activate
Now we're ready to start.
We're gonna use Fastapi as API server
https://fastapi.tiangolo.com/
If you don't know async
https://fastapi.tiangolo.com/async/
super TL;DR
Imagine a train station
- you buy a ticket
- you go in front of the door
- you show your ticket the door opens and you can go to the train
with async, doors open based on the single person action (once he scan the ticket he needs to move out from the queue).
without async, one door opens at time and only one.
Regardless if peoples keep scanning their tickets, they must wait until another door closes.
If one guy is stuck in the only door...
meh... the whole station hangs.
SlowApi as rate limiter (you can limit the calls to your api)
https://slowapi.readthedocs.io/en/latest/
Motor to use async mongodb databases
https://motor.readthedocs.io/en/stable/tutorial-asyncio.html
Uvicorn as ASGI web server
https://www.uvicorn.org/
python-dotenv to read .env files
httpx to make async get/post calls
Install the libraries
pip install fastapi slowapi motor uvicorn python-dotenv httpx jinja2
Create a new file called api_main.py and import all the packages needed
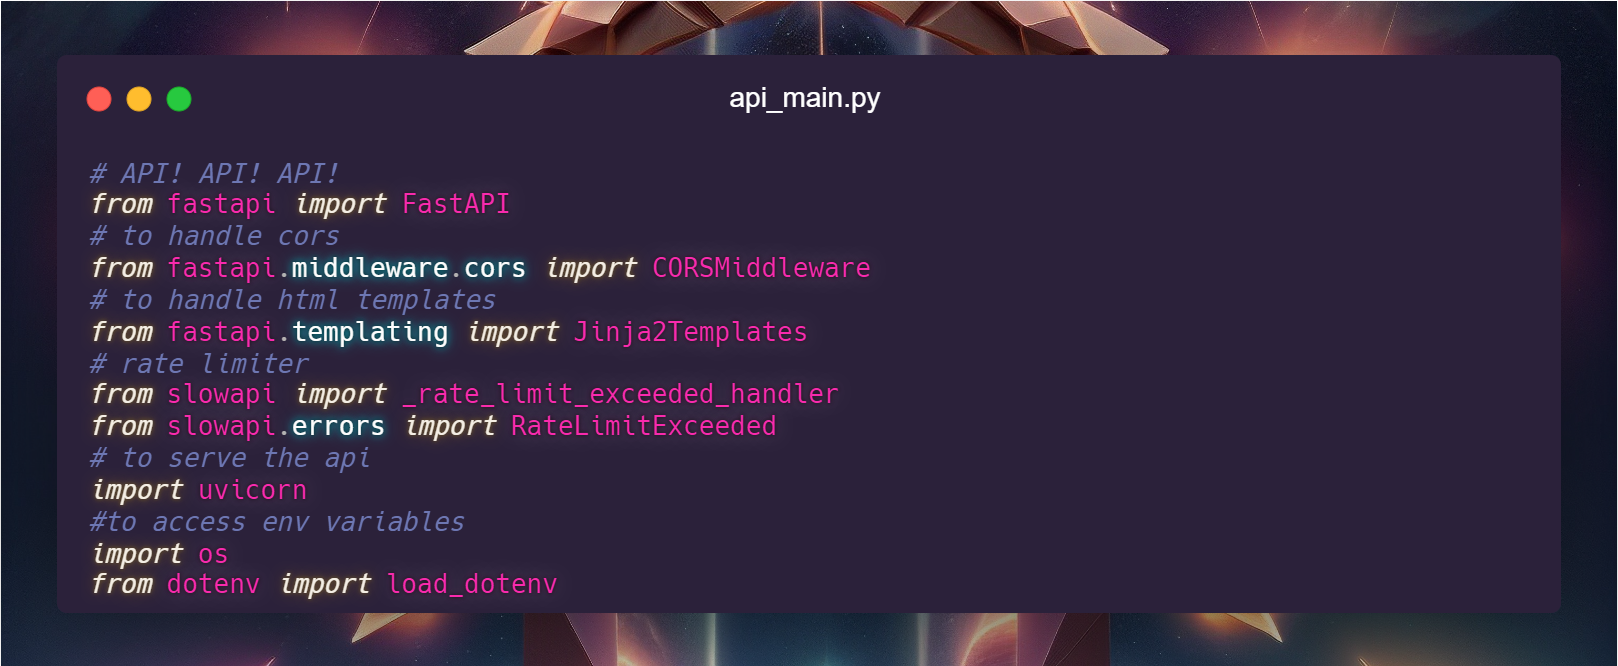
CORS is a security mechanism to let web services understand from where the web request is coming from.
To avoid problems with that during our development phase (but not in production) we simply accept any source.
Let's now define our API.
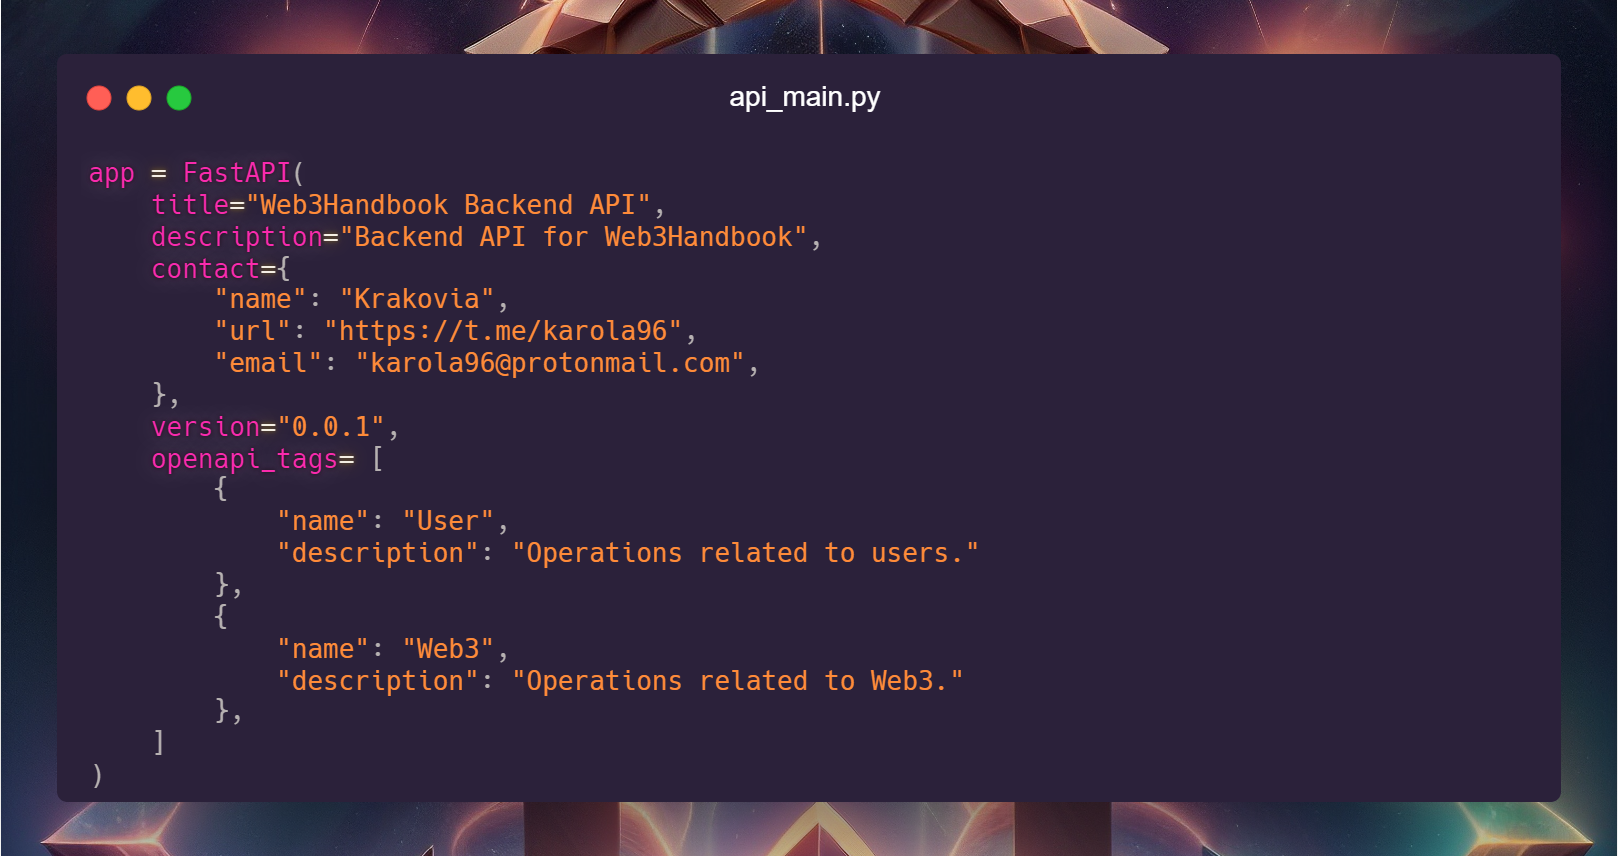
We set the title, description and our info available in the /docs, that's a FastApi auto-generated docs available each time you start the api server.
Tags are a special identifier to assign certain endpoints to those, useful to filter out lot of endpoints.
It's not a big time-consuming thing so i always recommend to give your api a proper design especially for frontend or external developers.
Let's now load the .env file
Notice: we check if the MONGO_USERNAME variable is already available, this means we're running the api as docker, so we can skip the load from file
We point the Jinja2 templates to the "static" folder. You will be able to serve pages and files from there.
Then we set up the limiter
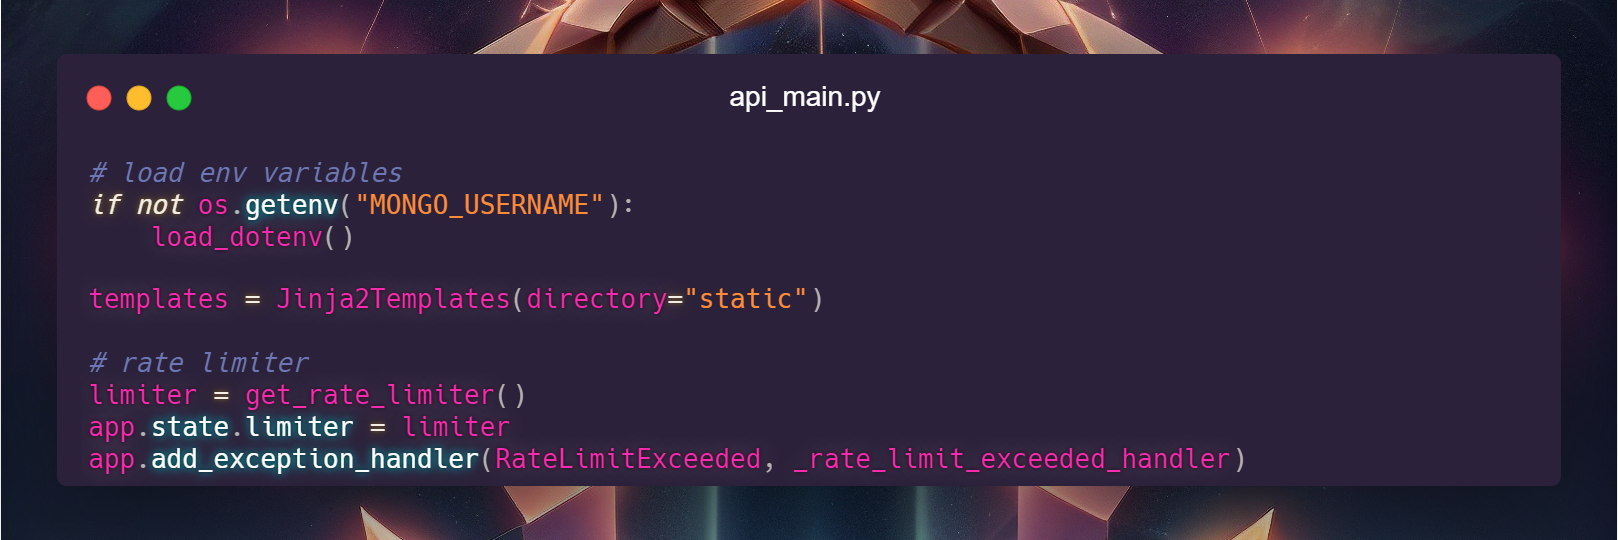
the main file is nearly done but we already have some "unknown" code there.
We need to define get_rate_limiter()
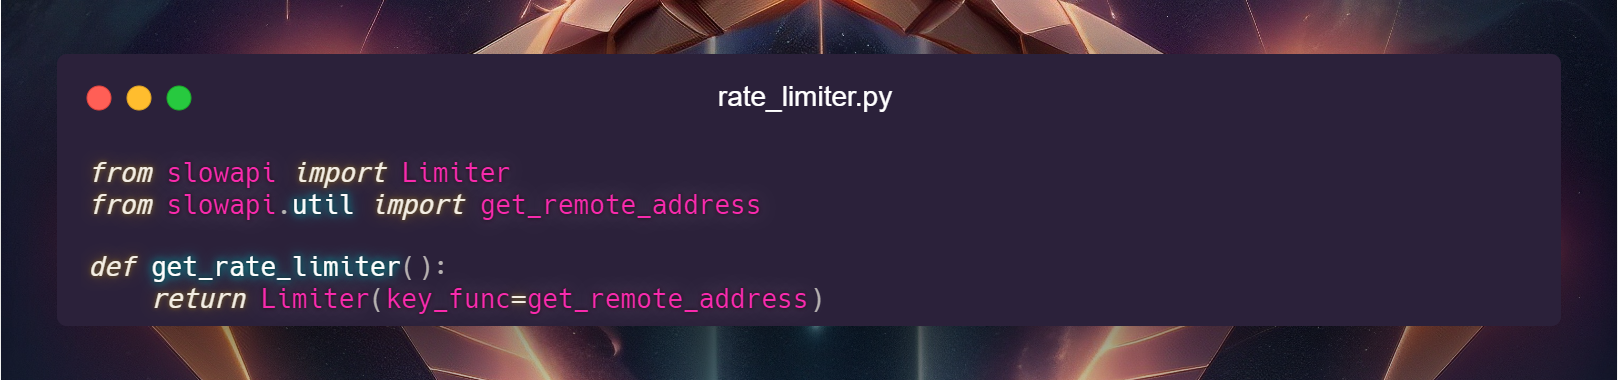
create a new folder called "core", then create a folder called "various"
This give us a basic modular structure.
core - all the core modules are there
various - generic modules are here
inside "various", create a file called "rate_limiter.py" we define a basic rate limiter
Now what we need is an endpoint.
Let's make our first endpoint but...
What is an endpoint?
You see, one does not simply open a website and receive data, there's more then that happening in the background you when you open a website.
If you think about that in depth, the first thing is a trigger that move your body molecules to give that input to the computer.
Then the computer prepare a package of data that get sent through your cable then modem to your ISP, targeting your DNS server asking what IP www.website.com has, etc etc.
Lot of things.
Most of them at the end are api endpoints.
- You send a new twitt/post? you interact with a POST endpoint.
- You load up homepage? you interact with a GET endpoint.
- You update your bio? you interact with a PATCH endpoint.
- You delete a post? you interact with a DELETE endpoint.
- You update a sale post? you interact with a PUT endpoint. (That's a general presentation, you can use a POST endpoint to get info, for example)
We create API endpoint to serve the world.
Just like bees, api = bees in italian.
They save the world.
We serve the world.
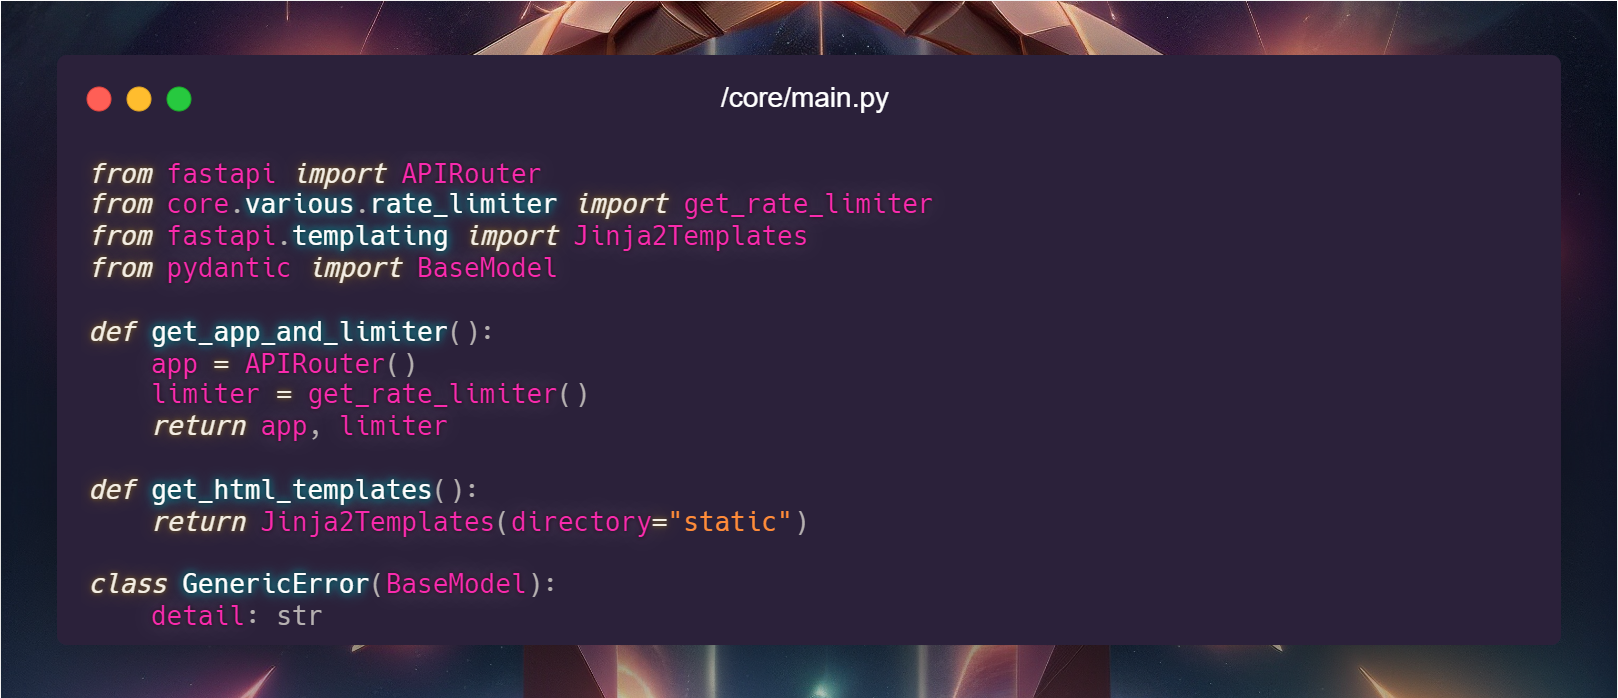
Before creating our endpoint we define a main.py file inside /core to serve the APIRouter, limiter and Jinja2 template to all the modules "app" is the FastAPI router, we are defining an endpoint of a route.
Example: if the endpoint is /prices, we are defining the route "/all".
Think in levels, we're defining the level after /prices/*
Now let's get to our endpoint
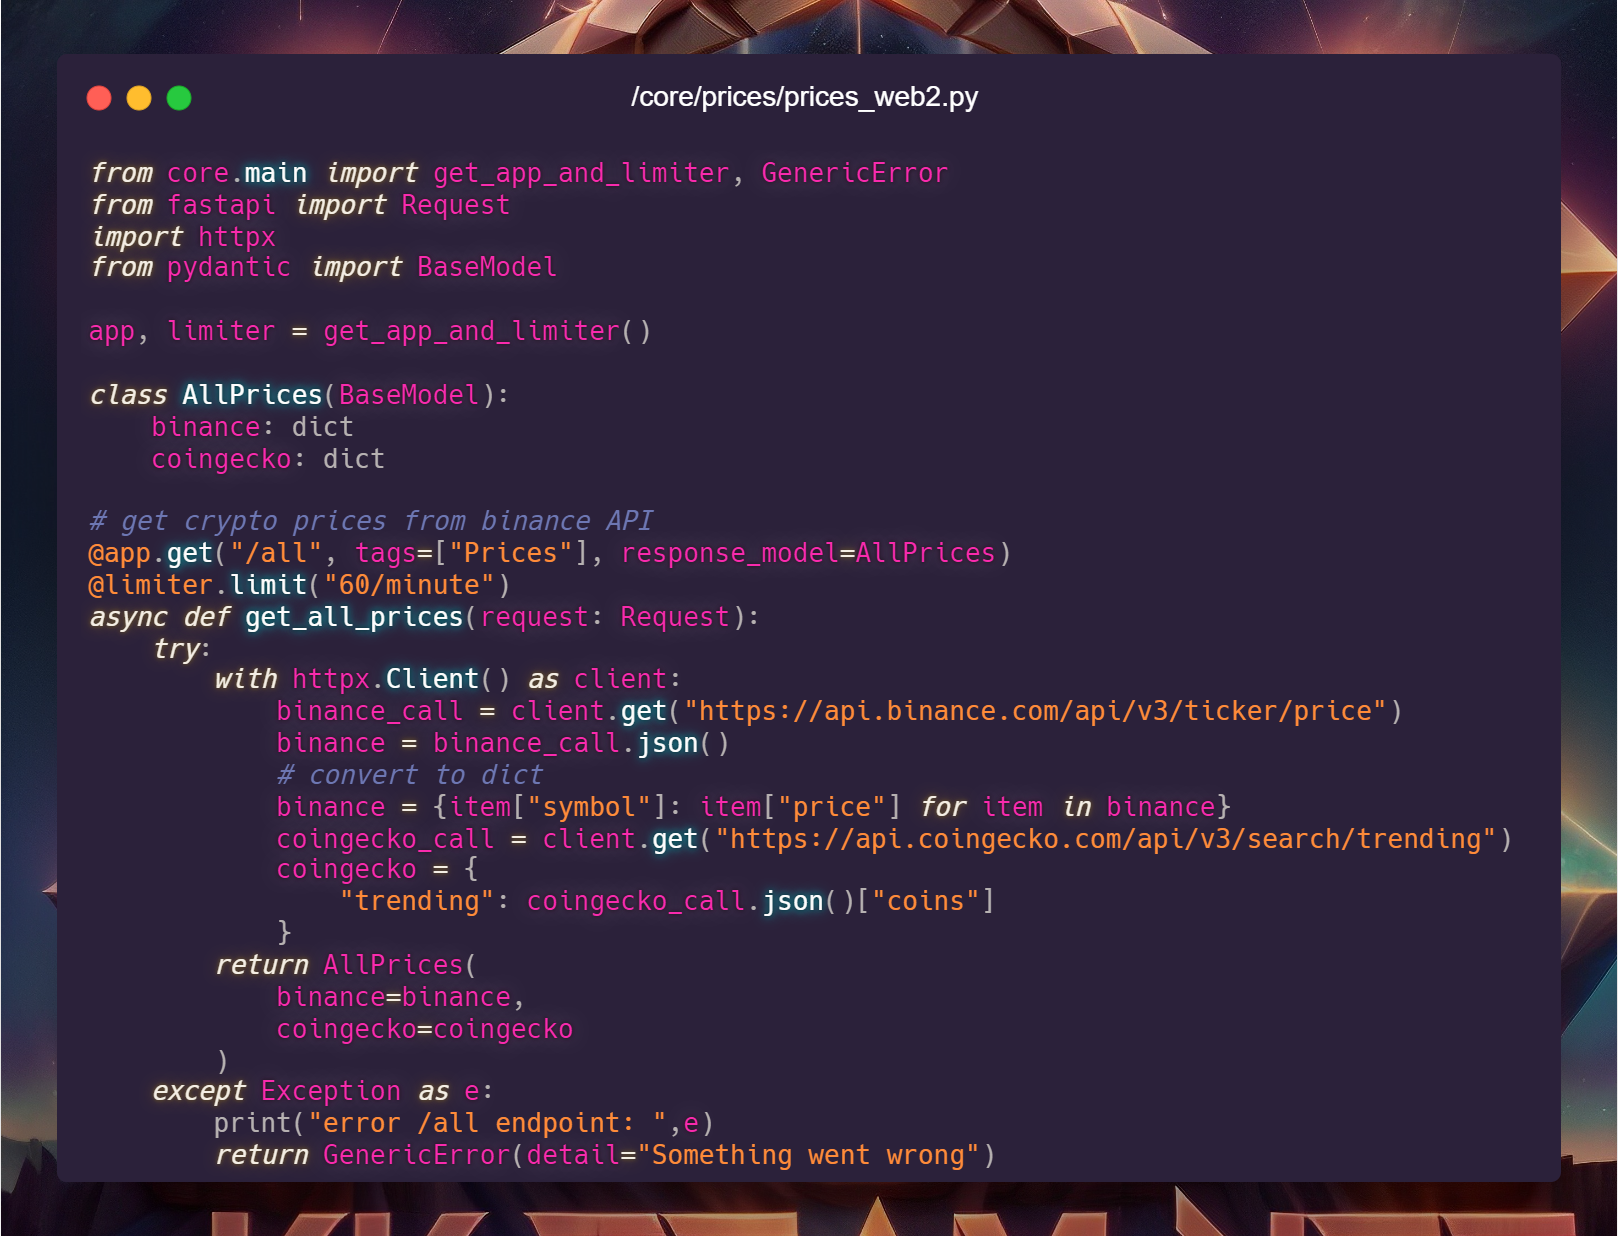
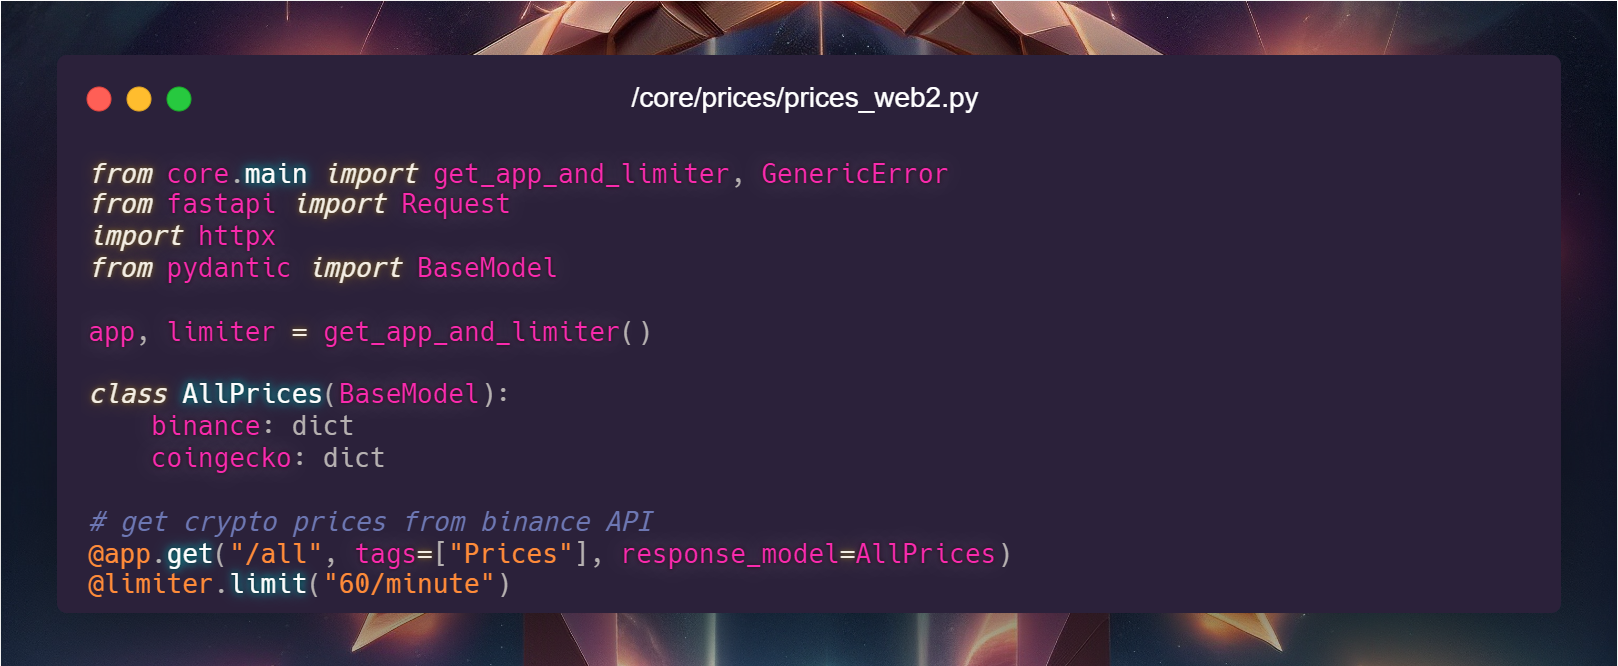
create core/prices/prices_web2.py
Holy fox! "easy way"?
Yes, follow me.
We import the rate limiter and app from the function we defined earlier along with the generic error.
The class "AllPrices" is a Pydantic base model, similar to interfaces in solidity.
Same target, giving the type of the variables to who's calling.
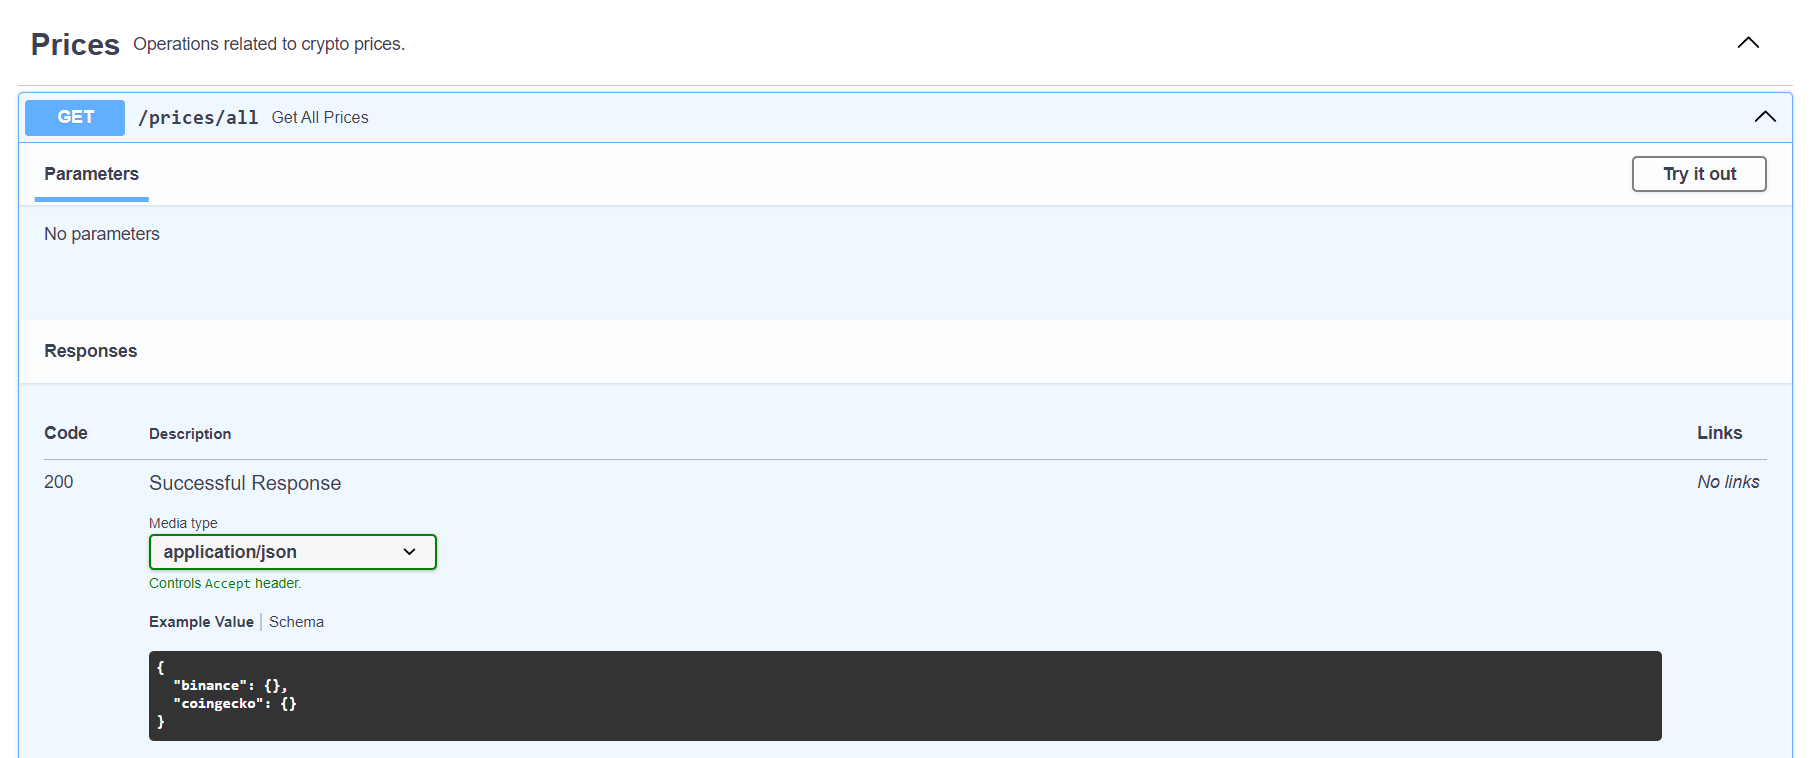
We want our endpoint to return two dictionary, one with the Binance's'prices, one with the Coingecko data.
app.get
We are using "GET"
Means we are creating and endpoint to GET data from our server.
our endpoint will be www.ourwebsite.com/???/all
??? soon explained
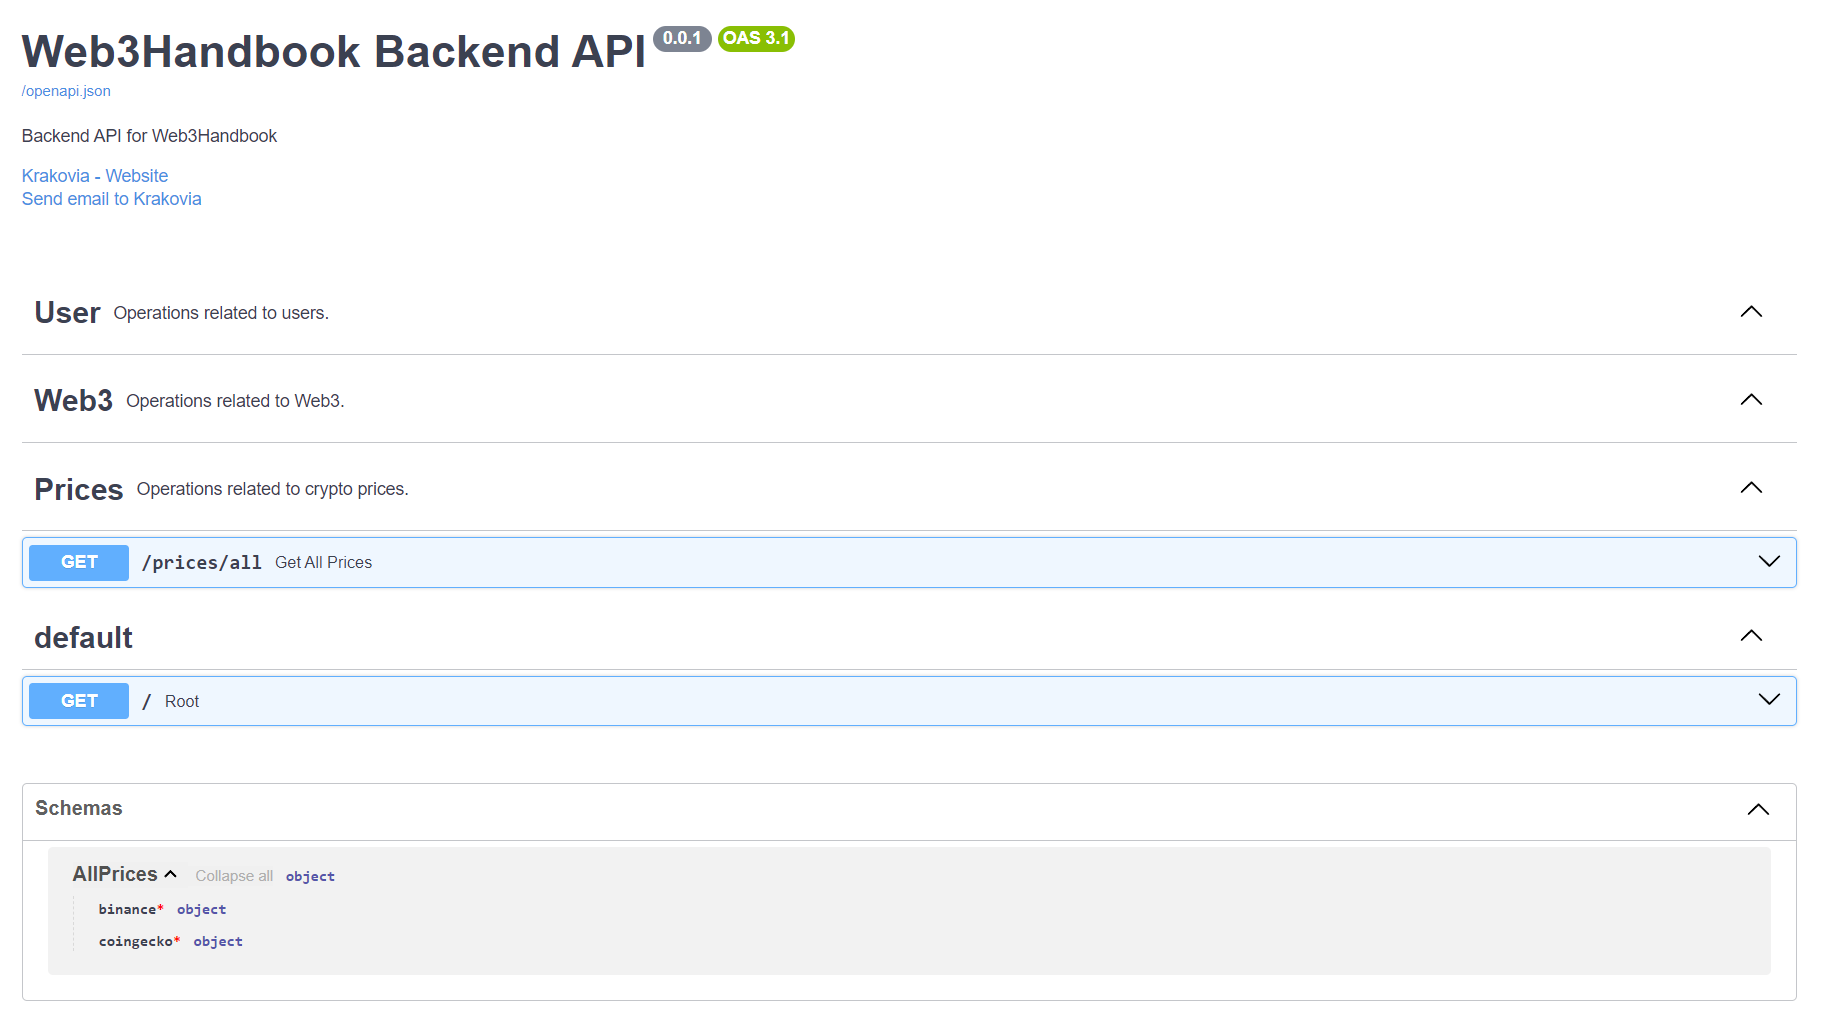
Let's assign the tag "Prices" and we define it on "openapi_tags"
we select AllPrices as response model for that endpoint.
This means anyone can understand what kind of data will be served from that endpoint.
It will never return an integer instead of two dictionary, for example.
Finally, let's apply a limit of 60 calls per minute
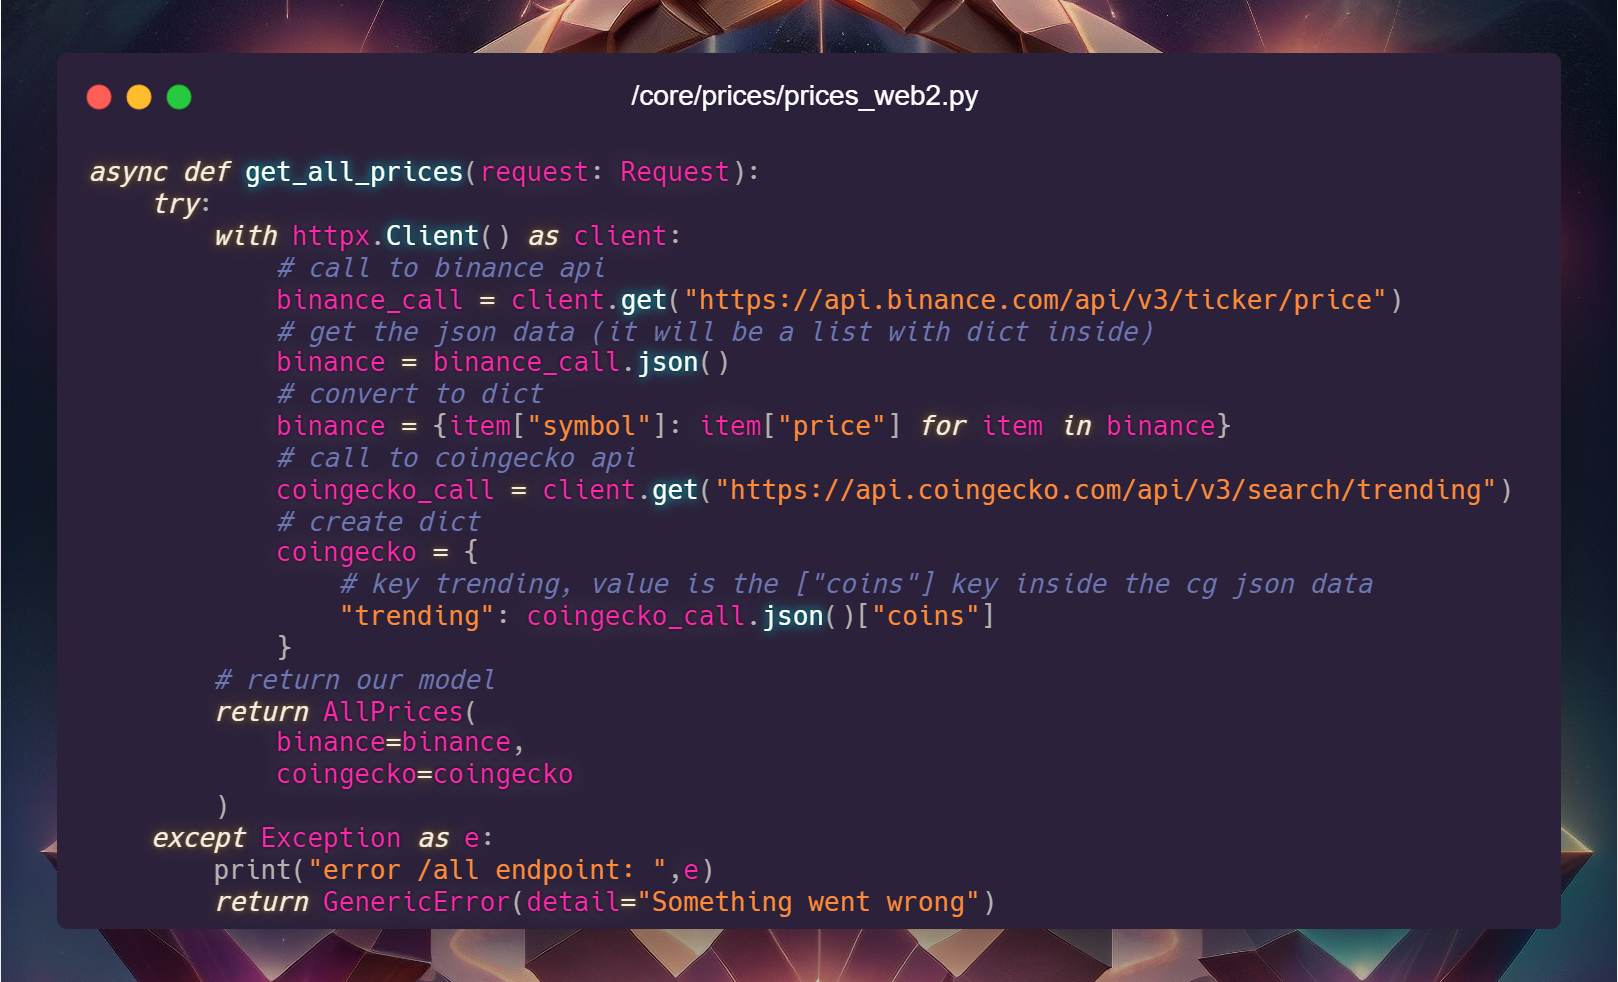
We want to get both prices & trending tokens from Binance & Coingecko.
We do a little data manipulation by parsing and creating a new dictionary.
Finally we return our data following the AllPrices model we just made earlier.
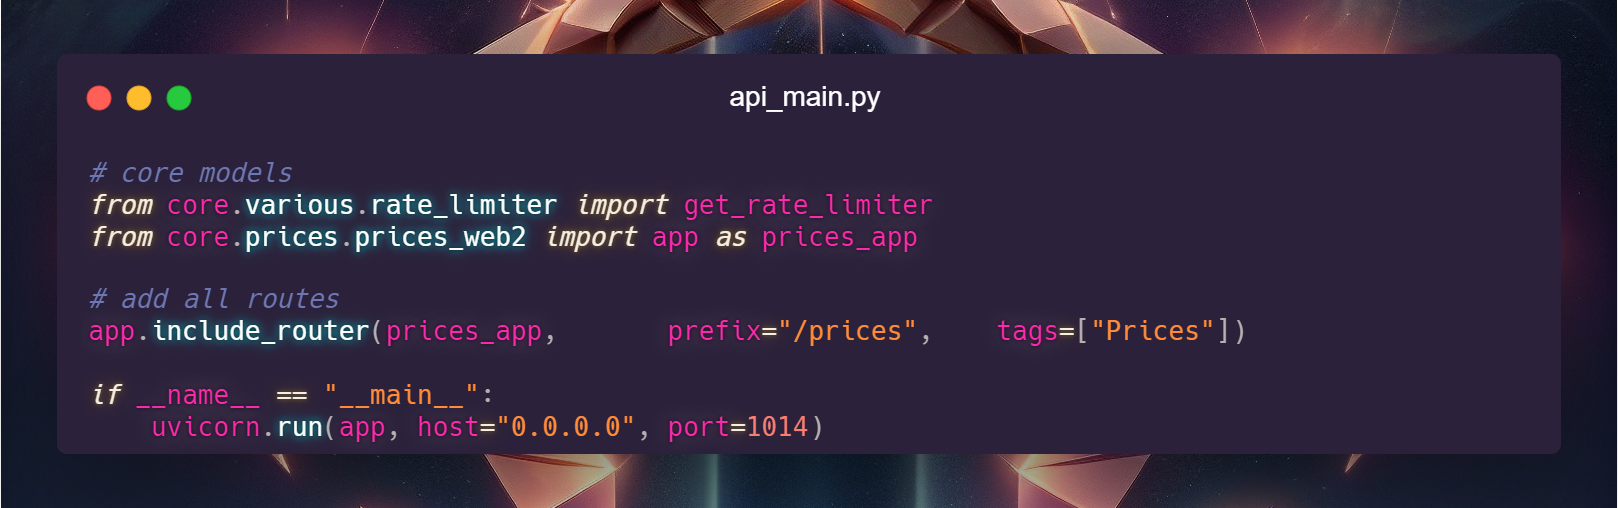
Let's attach our /all endpoint to our main /prices route
Back to our api_main.py
Add the imports on the top of the file, we are importing our own files as packages.
To make it more readable, when you import an "app" from a package, always rename it with "as".
It make more easier to read.
Add the route to the main "app" variable.
We create the route /prices and the "prices_web2.py" will handle all the endpoints under /prices
Finally, we run the script on all the interfaces on port 1014
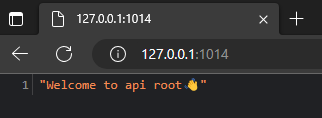
Time to test our backend! let's run that file with
python api_main.py

Let's open http://127.0.0.1:1014 !

Well that's disappointing.
What is this?
Very simple, we created a single route and a single endpoint, /prices/all
but we are visiting /
the root of the api.
Nothing is there, let's add the endpoint real quick to at least say hello.
@app.get("/")
async def root():
    return "Welcome to api root👋"
We add those 3 rows to our api_main.py and restart the api.
Now we have defined the root endpoint!
Let's visit our docs on http://127.0.0.1:1014/docs
This is the "bible" of any api, the swagger interface.
Any dev can understand and interact with your api, yourself included.
Let's open the /all endpoint we created earlier.
We can see our AllPrices model, the description we set in the function and the "Try it out" button, click on it and click "Execute"!
Or visit http://127.0.0.1:1014/prices/all
And just like that, we created an endpoint with both Binance & Coingecko data aggregated.
To conclude, let's generate our requirements.txt with
pip freeze > requirements.txt
This will safe our packages name & version to install the virtual enviroment.
Here lot of troubles can happen, as we're on Windows and we are gonna host those on Linux.
Lot of times some packages are NOT available in both systems and the code itself COULD BE different depending on the system.
As that's a really general and vast topic i won't cover those in this guide.
Now we need to host this api somewhere for the public use.
From here, there are way too much ways to do that.
I'll show what i've used to put the website you're reading now online and behind a reverse proxy.
First, remember what i said earlier? think on what happens when someone request data online.
Lot of computers and scripts get involved.
We need to create that flow, at least a part of it.
What we need:
- A domain, i'll use "kkteam.net", you can get one on https://www.namecheap.com/
- DNS resolver on Cloudflare.com to enjoy reverse proxy & DDOS protection for free
- A Virtual Machine with docker & python installed
For this part i'm using one of my public VM, that's a 4.99$ VM on https://contabo.com No excuses to not spend those 5$, it can host all you need if you protect it enough.
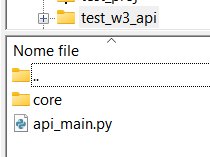
Once you got access to your VM, login via SFTP and upload
- core folder
- api_main.py
- requirements.txt
to "/test_w3_api".
You can use https://filezilla-project.org/
Now login via SSH, create a tmux window
If you don't know tmux, install it.
It will let you run scripts in the background.
It's a console window manager.
Game changer if you never used it.
https://linuxize.com/post/getting-started-with-tmux/
send those commands in order
python3 -m venv venv
source ./venv/bin/activate
pip install -r requirements.txt
python api_main.py
- we create the virtual env
- we activate teh virtual env
- we install the packages required
- we start the api server

We're on! on all the interfaces! (you need to restrict/firewall it before going on production)
So you can already access your API server from the public IP of the virtual machine.
You don't want to do that for everyone.
Let's protect that IP with CloudFlare.
My domain is kkteam.net, let's put that API on w3-api-guide-example.kkteam.net
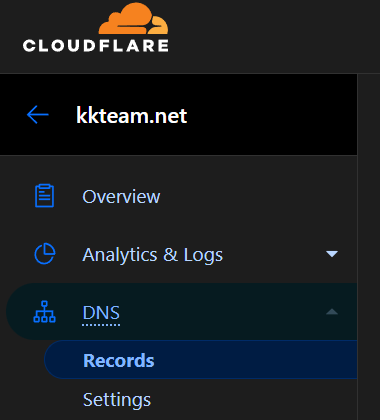
We need to add an "A Record" with "w3-api-guide-example" as Name and the IP of our VM as Content

Usually those edits take few seconds to be available

DNS, good to go on the source side.
Let's go on the server side.
We need to handle those incoming requests from Cloudflare.
I use Nginx Proxy Manager with Docker to handle reverse proxies.
https://nginxproxymanager.com/
I won't explain how to install it but i'll explain how to use it.
You should already have an SSL certificate configured in your proxy manager.
Those are available from your Cloudflare once you switch the DNS nameservers
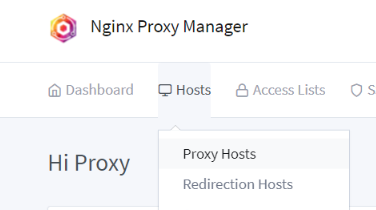
Go on Proxy Host and add a new one
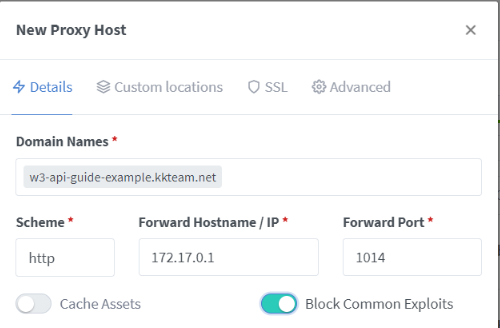
Set our subdomain + domain on "Domain Names"
Set the correct IP where the API are executing.
Given the fact Nginx Proxy Manager is a docker, it's network is the Bridge docker network.
The IP of my docker bridge gateway is 172.17.0.1
Docker is complex when it comes to networking and for oblivious reasons i won't cover this in that guide.
This is the "basic" approach and not the best one when it comes to security.
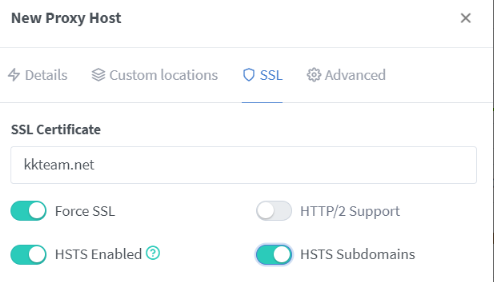 Don't forget to enable & force the SSL.
We don't want any insecure transmission of data in&out of our servers, okke?
To see the magic, just go to https://w3-api-guide-example.kkteam.net/docs
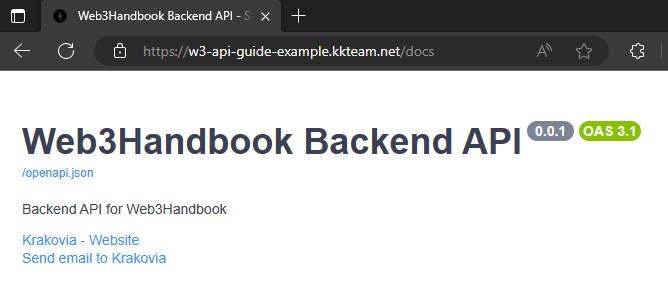
You've not only developed an API but also successfully deployed a full website on a public domain with SSL encryption and fundamental server identity protection.
If someone perform an "nslookup" on your domain they wouldn't easily discover your IP address.
However, keep in mind that the IP exposure depends on the services you choose to host and that's entirely under your control.