How to create your own crypto token - The easy way
ERC20
ERC20 is the global standard for fungible tokens.
WETH is the ERC20 version of ETH, for example.
The first one I've bought (and deployed) was SafeMoon.
After that I bought too many tokens and deployed lots of ERC20 on various networks to understand them deeper.
You're more involved if your money are in the game, right?
I'll give a small breakdown on how the standard works.
If you want a deeper knowledge about standards, please refeer to
Here's an ERC20, specifically Token.sol - the core of our token
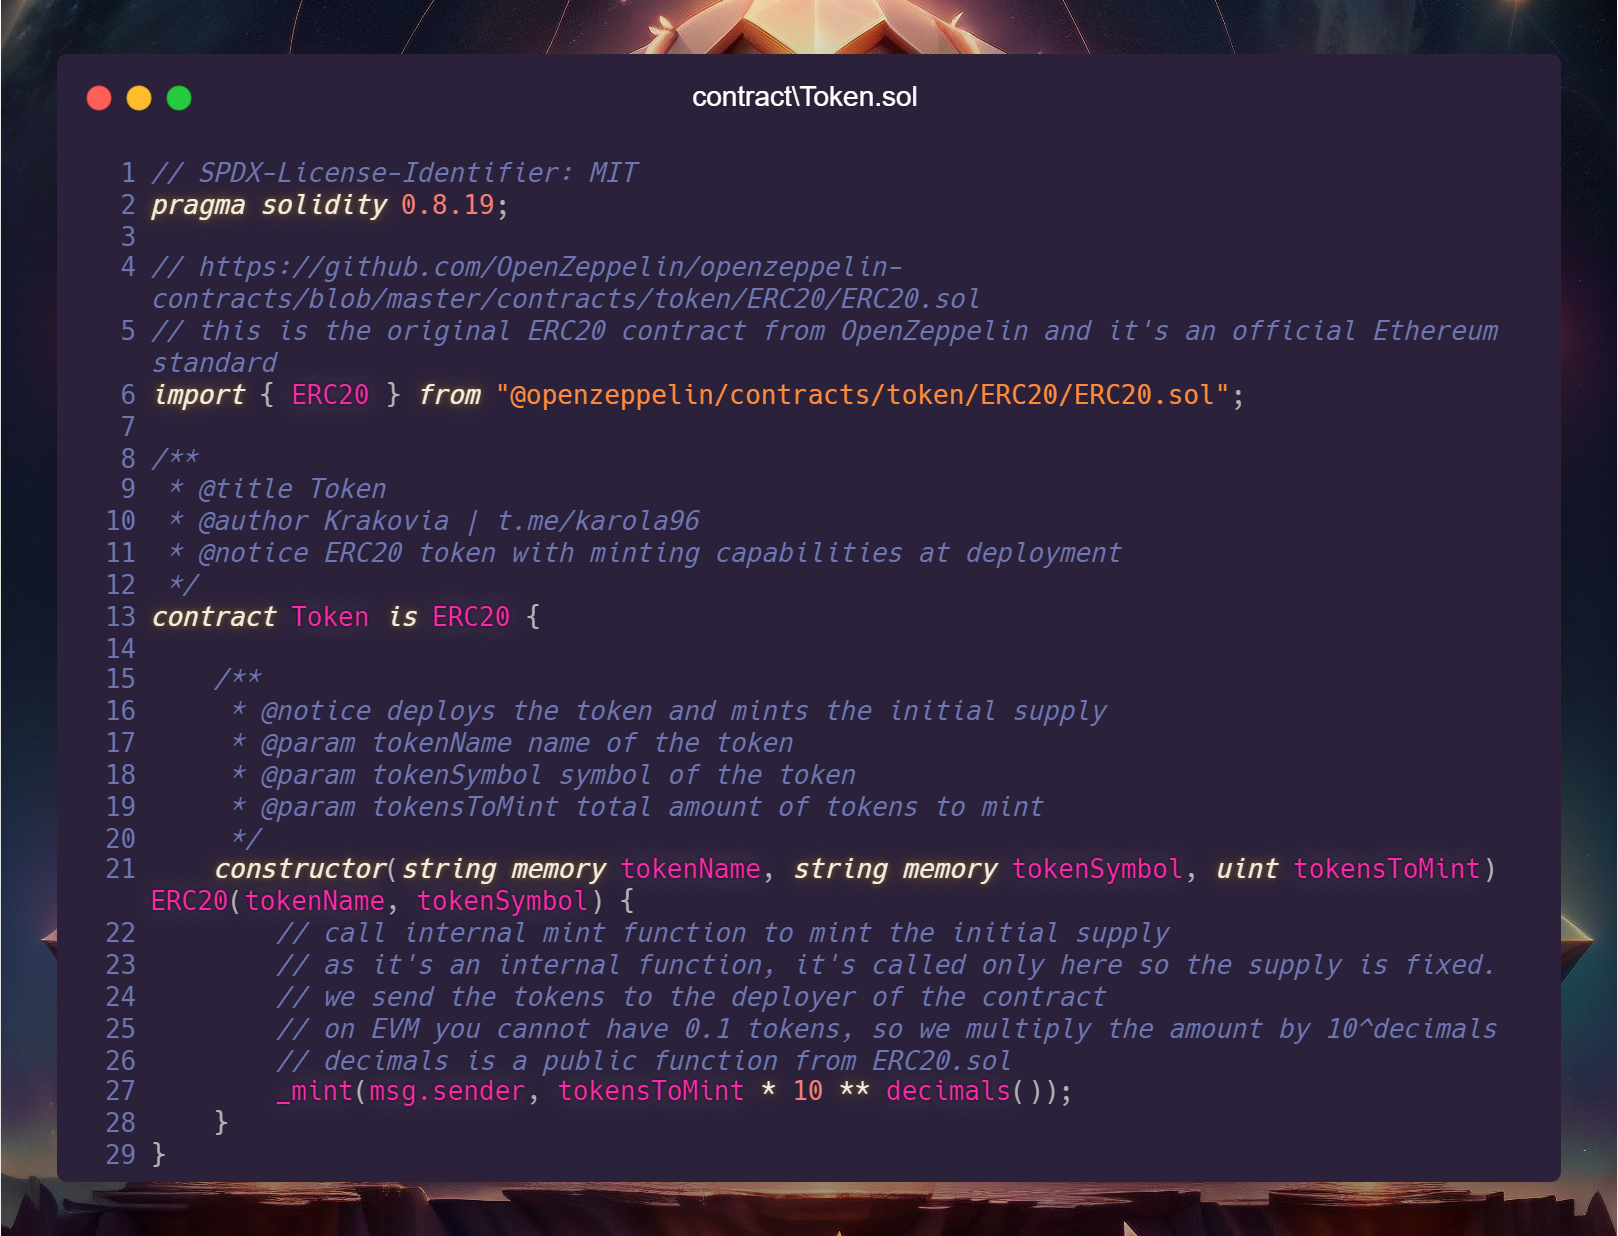 You can access the original ERC20 contract from OpenZeppelin at this link: OpenZeppelin ERC20.sol.
The code comments explain its functionality but in brief the deploying account will receive the amount of tokens specified in the deployment transaction.
How does it work?
The ERC20 standard is a set of rules that a contract must follow to be considered an ERC20 token.
The contract is called Token but it's inheriting from ERC20, which means that it's implementing the ERC20 standard along with all the functions needed.
- the contract has
transfer,transferFrom1 functions to move tokens decimalsto fractionalize the token on the off-chain 2totalSupplyto know how many tokens existsbalanceOfto know how many tokens an account hasapproveto allow an account to move tokens on behalf of an account3allowanceto know how many tokens an account can move on behalf of an account
There are of course other functions, like name, symbol but those are considered optional.
how do we move user tokens?
1 transferFrom is used to move tokens from an account to another, but the tokens must be approved first.
This means if you want to let a contract handle tokens from users, they must approve AT LEAST the exact amount of tokens your contract is going to move.
user -> token.approve(contractAddress, amount)
user -> contract -> token.transferFrom(userAddress, address(this), amount)
2 The EVM doesn't read 0.1 numbers. In solidity 3/2 is 1 so we use decimals to fractionalize the token.
Example: If we have 9 decimals in our token, 1 token for the contract is 1000000000 (1 * 10 ** 9) for the EVM.
Remember you can use 1_000 ethers in solidity to represent 1000000000000000000000.
3 approve is used to allow another account to move tokens on behalf of us.
When we need to interact with a contract function that calls transferFrom, we need to approve the contract to move tokens on our behalf.
Routers are an example for this, we allow infinite tokens to be moved from our account to the router. While it's not the safest thing to do, the router can move tokens from our accounts only by us signing a transaction.
This open up to lot of issues & scams but it's not a bug, it's a lacking knowledge about the system.
Solutions like Wallet Guard can help preventing this kind of scams.
Choose your Hero: HardHat or Foundry?
👷♂️HardHat
Run the command:
npx hardhat test .\test\Erc20\TestToken.js
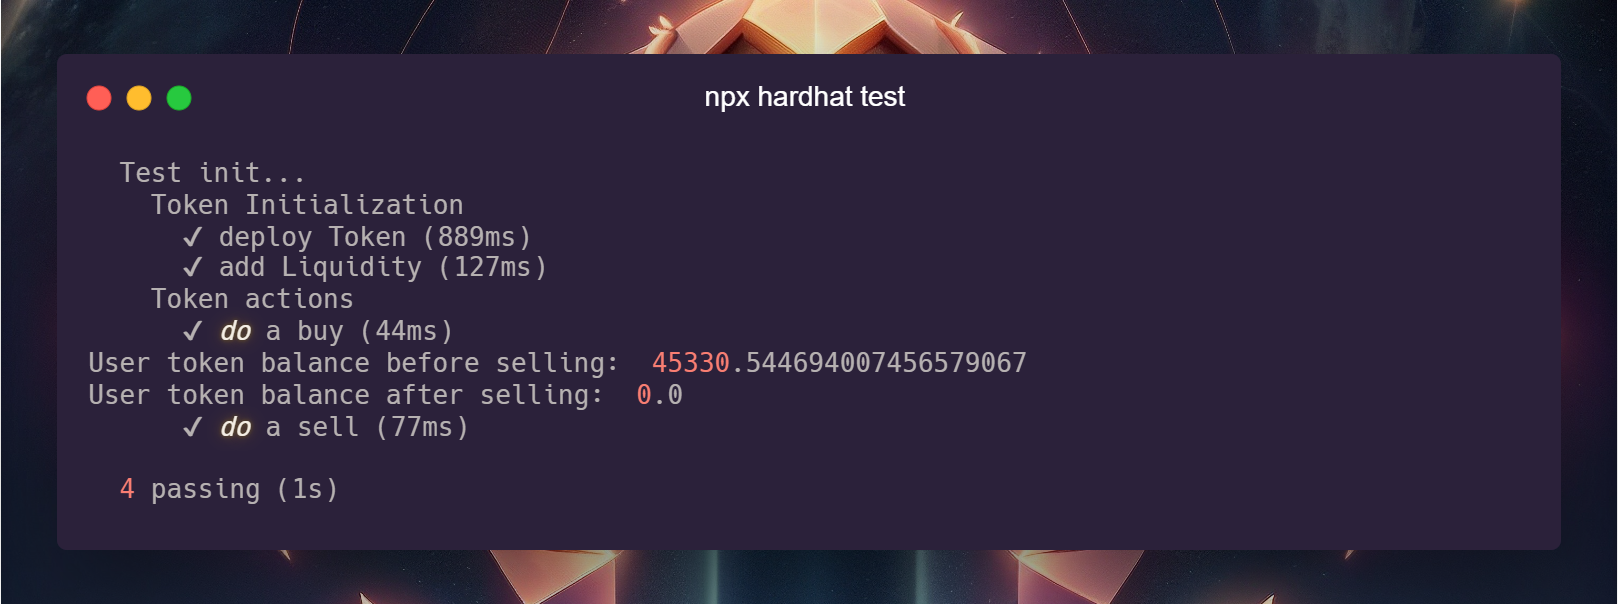 You should see the output as shown here
The command npx hardhat test runs all the test files in the /test folder, to run a specific test file, you can use the command npx hardhat test fileName.js.
You can also run multiple tests by concatenating the file names.
Since these are JavaScript files, the initial lines are dedicated to importing necessary modules.
Chai is used for expect statements.
const { ethers } = require("hardhat");
Hardhat tests are divided into sections and in our setup, we're not utilizing fixtures. Instead, each test uses the same state as we want to keep things simple and avoid unnecessary complexity.
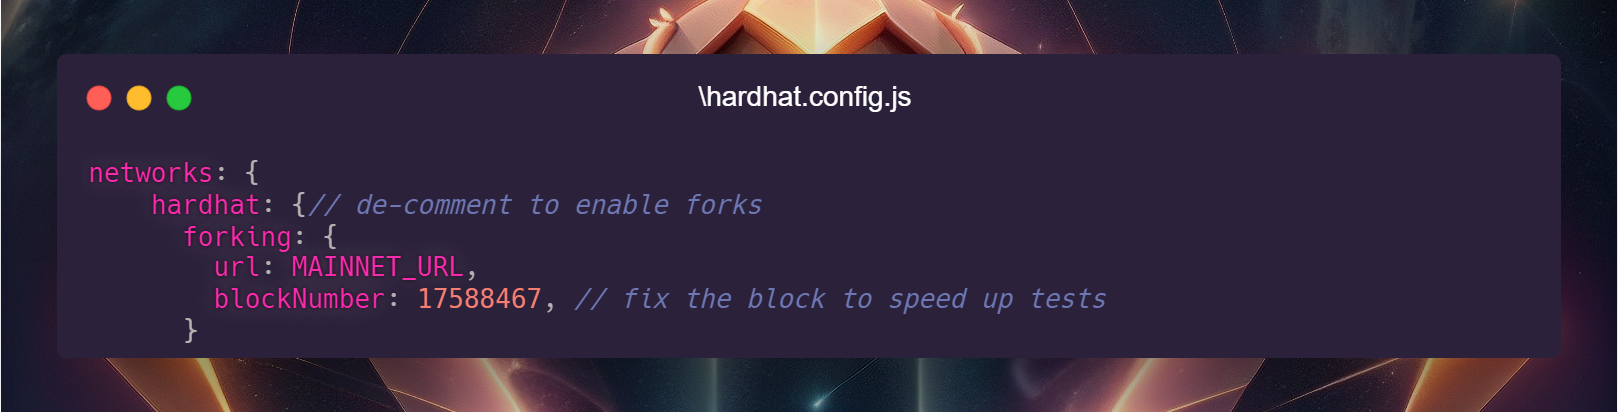
By default, when you run any script or test in Hardhat it uses the "hardhat" network.
If you look carefully our current setup is forking Ethereum network on startup in the hardhat netwok
🛠️Foundry
Run the command:
forge test --match-contract TokenTest
you can also use --mc instead of --match-contract
Running 1 test for test/Erc20Fees/Token.t.sol:TokenTest
[PASS] test_Trading() (gas: 190958)
Test result: ok. 1 passed; 0 failed; 0 skipped; finished in 296.27ms
You should see the output as shown here
In just a matter of seconds we:
- Deployed the contract
- Added liquidity to Uniswap
- Checked the balances of the newly created pair
- Performed buy and sell actions with a user
- Checked the user balance
That's it! we created our token and it's now available on Uniswap!
(on localhost only! :D)
If you're feeling like a superhero now, that's exactly how I felt when I transitioned from Remix to HardHat.
With this setup, you can operate as anyone on any blockchain, at any time, in any state.
However, that's not the focus of this article, so let's return to our token!
Here are some key points to remember:
- We call "Fork" the process of copying the state of a blockchain at a specific block number on your server/PC and run things against it. Like a photo.
- When forking a network at a specific blockNumber, any states beyond that block won't be present in the fork.
For instance, if you deploy a token on ETH, you won't see it if you fork from block17588467. - On HardHat you can remove
blockNumberkey from config to always fork ETH at the latest block available (Foundry:--fork-block-number) - You can access ETH as if it were on your own PC and alter it's state
- Anything that alter a single data on the blockchain is altering the "state".
- The difference between a mainnet and a testnet, given the same EVM stack & settings, is the state and the length of the chain.
- Your balance is a state.
- Your ERC20 tokens are a number inside a mapping on the token contract.
- Your wallet never holds anything, it's just a key to alter the state.
Now let's deploy in localhost!
Before doing this... please add this private key in your .env file
PKEY_ACC1 = "0x0805fb608a56cc098ac55ba2a8dfee0fd708e95f238debfc2480e084b0e5ef61"
Wait to see the magic..
Run this
👷♂️HardHat
npx hardhat run .\scripts\Erc20\DeployToken.js
You will get EXACTLY this.
script running on network ID:  31337n
owner address:  0x696b217e6f4609316037bfbA77b3B65Bd0369Ac5

--🟡Executing script 0🟡--

⚪Deploying token...
✅token online on: 0x9DEC830dD1f5Cf005005Ac6261D651fd85701B10

--🟢Script 0 Done🟢--

All done.
🛠️Foundry
Foundry doesn't spawn a local RPC to execute the scripts like hardhat.
We have to launch an Anvil RPC in another terminal.
anvil --fork-url mainnet
And fund our deployer
cast rpc anvil_setBalance 0x696b217e6f4609316037bfbA77b3B65Bd0369Ac5 10000000000000000000 --rpc-url localhost
Then we can run the script
forge script .\scripts\Erc20\deploy.s.sol:RunScripts --rpc-url localhost
You will get EXACTLY this.
Script ran successfully.

== Logs ==
  token address:  0x9DEC830dD1f5Cf005005Ac6261D651fd85701B10
Now... run it again!
You will get the same thing.
(On Foundry, you need to reset the RPC)
If you search for 0x9DEC830dD1f5Cf005005Ac6261D651fd85701B10 on Etherscan, you won't find it.
That's normal, because we deployed it on localhost.
However, you might wonder why the address is the same.
The reason is that the contract address is derived from our private key + the account nonce.
Even if you modify the contract code, the address will remain 0x9DEC830dD1f5Cf005005Ac6261D651fd85701B10.
Yes, you can obtain this address before deploying on the Ethereum mainnet.
I can guarantee you that this is the address that will be deployed, thanks to the deterministic nature of the EVM.
At the moment of writing this is correct.
if someone use that private key and make a transaction on Ethereum mainnet the token address will be different!
Let's dive in the core concepts of the HardHat script. (read even if you use Foundry)
👷♂️HardHat
By default when you run an hardhat script, one main function is executed. In my workspace instead, we choose what should be done.
Starting from the top, import the necessary modules and define the global variables that will be used throughout the script.
let chainId
let token
let tokenDecimals
let router
let owner
let routerAddress = "0x7a250d5630B4cF539739dF2C5dAcb4c659F2488D"
The router address is for the Uniswap v2 router at https://etherscan.io/address/0x7a250d5630B4cF539739dF2C5dAcb4c659F2488D.
Since we are forking the Ethereum mainnet, we'll be adding liquidity there.
The following represents the core logic of the script:
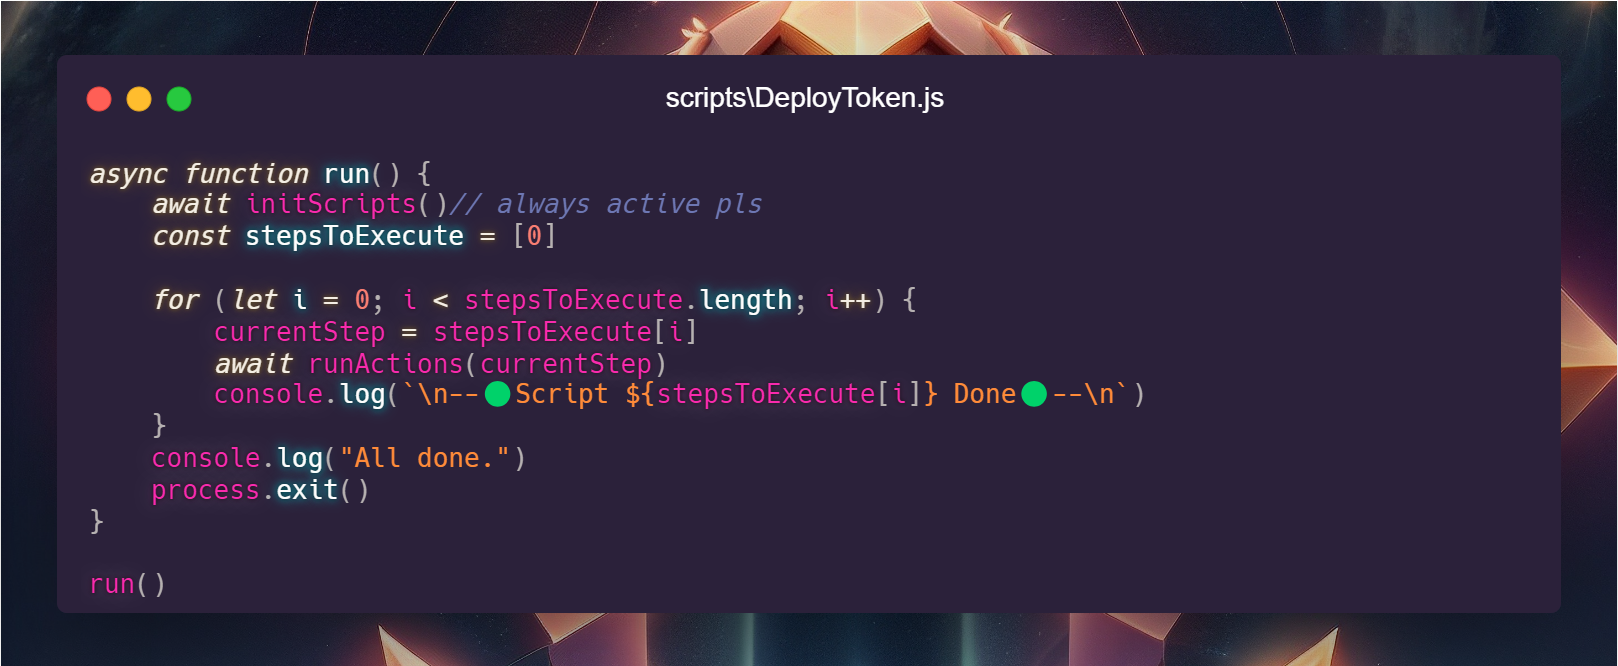 What the function does:
- Initializing the script
- Defining the tasks to be executed using "stepsToExecute" array
- Running through the tasks until completion
The function that determines which task to execute is defined here:
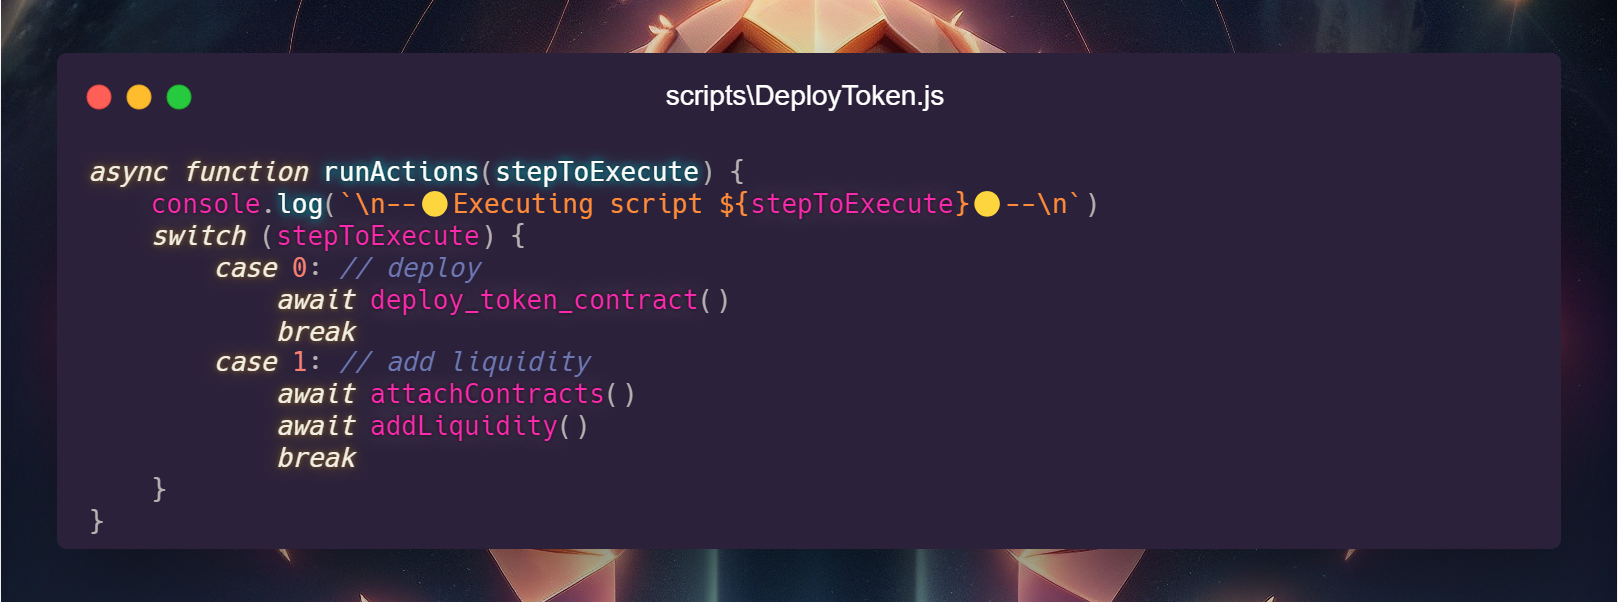 By default, the script runs case 0. In our case, this corresponds to deploying the token contract and printing it's address once deployment is confirmed.
Each function in this script represents a task, following this structure:
async function deploy_token_contract() {
    const tokenName = "token Name";
    const tokenSymbol = "token Symbol";
    const totalSupply = 1000000; // 1M

    console.log("⚪Deploying token...")
    token = await (await ethers.getContractFactory("Token", owner)).deploy(
        tokenName,
        tokenSymbol,
        totalSupply
    )
    await token.waitForDeployment()
    console.log("✅token online on: %s", token.target);
}
Within that function, we:
- Define local variables with token name, symbol and total tokens to mint
- Add console logs before and after the contract call
- do the deployment tx & wait for it's confirmation
- Print the deployed address
Now, you have two options:
- Run cases 0 and 1 together, but comment out "await attachContracts()"
- Apply the deployed code within the script
In most scenarios, it's safer to proceed step by step. Run case 0 to obtain the deployment address. In our case, it's 0x9DEC830dD1f5Cf005005Ac6261D651fd85701B10
The "attachContracts" function is used to associate all the necessary contracts for executing one or more tasks.
 Add the contract address we got from deployment script output to the global variables at the top of the file:
let chainId
let token
let tokenDecimals
let router
let owner
let routerAddress = "0x7a250d5630B4cF539739dF2C5dAcb4c659F2488D"
let tokenContractAddress = "0x9DEC830dD1f5Cf005005Ac6261D651fd85701B10" <--
Then, modify the "token" line, passing the address as a parameter:
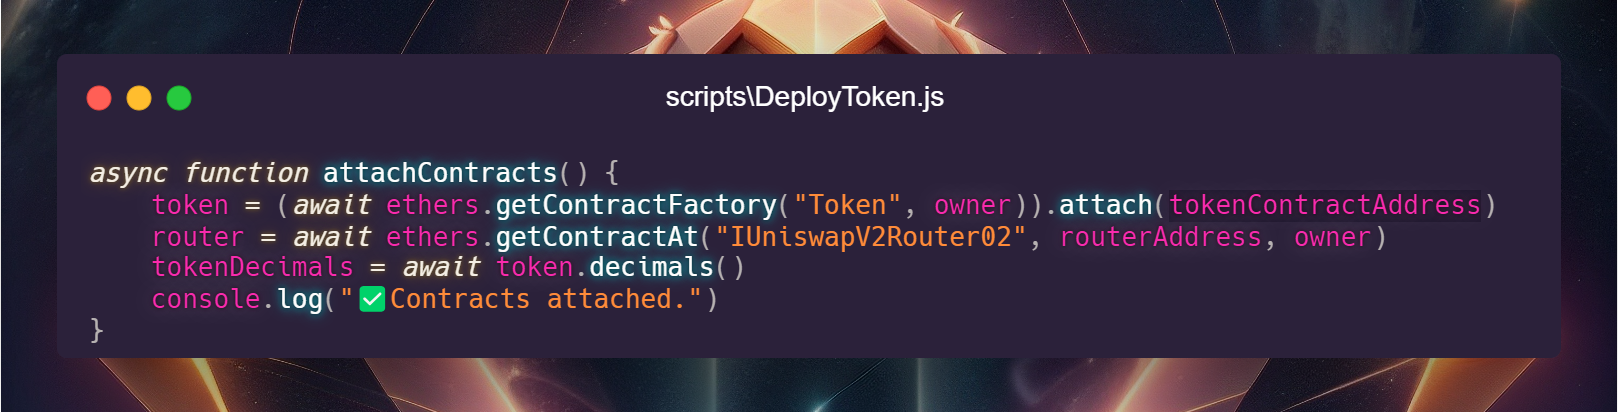 Now, whenever you need to run a task that involves interaction with our token and/or the router, you can directly call the "token" or "router" object within your functions.
Edit the "stepsToExecute" list and add case 1, like this:
const stepsToExecute = [0,1]
Now, run the script again.
script running on network ID:  31337n
owner address:  0x696b217e6f4609316037bfbA77b3B65Bd0369Ac5

--🟡Executing script 0🟡--

⚪Deploying token...
✅token online on: 0x9DEC830dD1f5Cf005005Ac6261D651fd85701B10

--🟢Script 0 Done🟢--


--🟡Executing script 1🟡--

✅Contracts attached.
⚪approving router...
Router approved.
Ratio: 100000 Token:10 ETH
⚪Adding liquidity...
✅Liquidity added.

--🟢Script 1 Done🟢--

All done.
The script performed two tasks even though you executed only one command!
This mechanism provides significant speed leverage.
How?
It allows me to deliver contracts in a short period of time with low effort, without compromising security.
(Spoiler: Foundry also do this.)
But what happened here? simple, we called addLiquidity() in the case 1 Let's take a look
async function addLiquidity() {
    const amount = ethers.parseUnits("100000", tokenDecimals)
    const amountETH = ethers.parseEther("10")

    console.log("⚪approving router...")
    let tx = await token.approve(routerAddress, ethers.MaxUint256)
    await tx.wait()
    console.log("Router approved.")

    console.log(`Ratio: ${amount/10n**tokenDecimals} Token:${amountETH/10n**18n} ETH`)
    console.log("⚪Adding liquidity...")
    tx = await router.addLiquidityETH(token,
        amount, // amountTokenDesired
        amount, // amountTokenMin
        amountETH, // amountETHMin
        owner, // to
        Date.now() + 600, // deadline
        { value: amountETH } // ETH
    )
    await tx.wait()
    console.log("✅Liquidity added.")
}
We define the amount of both tokens & ETH to add liquidity.
Remember that there are no decimals in Solidity. When you send 1 WETH to someone, you're essentially sending this instruction to the WETH contract: "Hello! I'm 0x...0, and this signed transaction authorizes moving 1000000000000000000 WETH from me to 0x...1."
Notice that enormous number? That's 1 WETH represented as 1 * 10 ** 18 or 1 followed by 18 zeros. Always remember this when dealing with tokens and their decimals. To improve the robustness of the scripts i always fetch the token's decimals dynamically from the contract at runtime, which helps avoid unpleasant surprises that I encountered in my journey (see the call to token.decimals() under attachContracts()).
We then define the approve call. The deployer account is requesting the contract address to approve the router to move tokens on its behalf, which is necessary for how the ERC20 approval works. When a contract needs to move tokens from another account, it must be authorized by the token's owner.
Here's a useful tip: If you send an approve transaction without waiting for its confirmation and then try to addLiquidity, the call will fail because the current chain state doesn't include your approval yet. To "resolve" this, you can override the gas value and nonce of the addLiquidity call. Ethers will calculate the gas value automatically (and will fail) if you don't override these fields. If you do override them, you can send the call just after the approve and it can get mined just after the approve call. Remember to do nonce + 1
However, there's generally no urgency to execute these actions in a single block. It's perfectly fine to follow the "workspace" approach: wait for the approval to be confirmed and then send the addLiquidity call.
Foundry's turn!
🛠️Foundry
While HardHat uses javascript, Foundry uses Solidity to launch scripts or tests. Let's start by fixing the solidity version and imports.
// SPDX-License-Identifier: UNLICENSED
pragma solidity ^0.8.13;
/**
 * @author karola96 | https://t.me/karola96 | https://kkteam.net
 */

import "forge-std/Script.sol";
import { Token } from "../../contracts/Erc20/Token.sol";
import { IUniswapV2Router02 } from "../../contracts/shared/DexInterfaces.sol";
Let's now define a contract that will handle the deployer's pkey, address and the modifier to sign the transactions.
// used to configure the signer account
contract Base is Script {
    uint256 deployerPrivateKey = vm.envUint("PKEY_ACC1");
    address deployerAddress = vm.addr(deployerPrivateKey);

    modifier broadcast {
        vm.startBroadcast(deployerPrivateKey);
        _;
        vm.stopBroadcast();
    }
}
Now it's the turn of Tasks contract, here we write basically every interaction with the contracts. It will help us stay organized and to re-use the code.
// define all the tasks of the project here
contract Tasks is Base {
    address public routerAddress = 0x7a250d5630B4cF539739dF2C5dAcb4c659F2488D;
    IUniswapV2Router02 router = IUniswapV2Router02(routerAddress);
    Token token;

    function deployToken(string memory name, string memory symbol, uint _tokenToMint) public {
        token = new Token(
            name,
            symbol,
            _tokenToMint
        );
    }

    function addLiquidityETH(
    address tokenAddress,
    uint amountETH,
    uint amountTokenDesired,
    uint amountTokenMin,
    uint amountETHMin,
    address to,
    uint deadline) public payable {
        router.addLiquidityETH{value: amountETH}(
            tokenAddress,
            amountTokenDesired,
            amountTokenMin,
            amountETHMin,
            to,
            deadline
        );
    }
}
Finally, the contract will all the tasks we should run.
// run the tasks order here
// forge script .\scripts\deploy.s.sol:RunScripts --rpc-url mainnet
// pkey must have some eth
contract RunScripts is Tasks {
    uint public tokenToMint = 1_000_000_000;
    uint public ETHInLiq =    1 ether;
    uint public tokensInLiq;

    function run() external broadcast {
    // deploy token
        deployToken("TokenName", "TokenSymbol", tokenToMint);
        tokensInLiq = token.balanceOf(deployerAddress) * 10 / 100; // 10% of tokens

    // approve
        token.approve(routerAddress, tokensInLiq);
    // add liquidity
        addLiquidityETH(
            address(token),
            ETHInLiq,
            tokenToMint,
            tokensInLiq,
            ETHInLiq,
            msg.sender,
            block.timestamp + 15 minutes
        );
        console.log("token address: ", address(token));
    }
}
Open now two terminals, one for the RPC and one for the script.
anvil --fork-url eth
Once the RPC is on, send some ETH to the deployer (it's an ETH fork, we don't have money there)
cast rpc anvil_setBalance 0x696b217e6f4609316037bfbA77b3B65Bd0369Ac5 10000000000000000000 --rpc-url localhost
Now we can run the script
forge script .\scripts\Erc20\deploy.s.sol:RunScripts --rpc-url localhost --broadcast

</details>

Congratulations! Your token can now go live!<br>
Want to go on mainnet? Send this article to your developer and join the space!<br>
If you're a developer, just replace the private key in the .env file with your own and run the following script (case 0 only)
```bash
npx hardhat run .\scripts\Erc20\DeployToken.js --network mainnet
or
forge script .\scripts\Erc20\deploy.s.sol:RunScripts --rpc-url mainnet --broadcast
I strongly suggest to avoid mainnet deployment if you're not sure on what you're doing.
I'm available for questions about anything you've read here.