How to setup the workspace to work with HardHat & Foundry
How do i deploy contracts on blockchain?
How can i talk with those?
Very simple and you have lot of options.
The workspace uses
- HardHat version 2.18.0
- forge 0.2.0 (0232ee5)
Sadly since i've started writing this book, most of my HardHat scripts/tests are broken due to recent breaking changes.
Most of the new articles will use Foundry as default framework.
- HardHat is a professional JavaScript framework to interact with smart contracts, account and EVM blockchains in general. It offers you all the tools needed to do basically anything.
- Foundry is a blazing fast, portable and modular toolkit for EVM application development written in Rust.
It gives you extreme power deep to the core of the blockchain system.
All in solidity.
If you don't know what to pick, choose Foundry because it's all in solidity and mostly used in this book.
Setup from scratch
Let's setup our PC.
To show the few steps we have to do before start playing i'll start from a clean virtual machine state.

Choose your Hero
👷♂️Install HardHat
Windows
We need Node.js, let's use Node Version Manager.
Download & install NVM
Once installed, open a windows command (CTRL+R --> write cmd --> press enter)
Launch the following command
nvm install 20.5.1
Once it's done
nvm use 20.5.1
Download the workspace [here]
It contains all the contracts, scripts and tests about this book.
Extract it somewhere in your PC and install the node packages with a package manager, by default it's npm
npm install
or
yarn install
or
pnpm install
and you should be good to go!
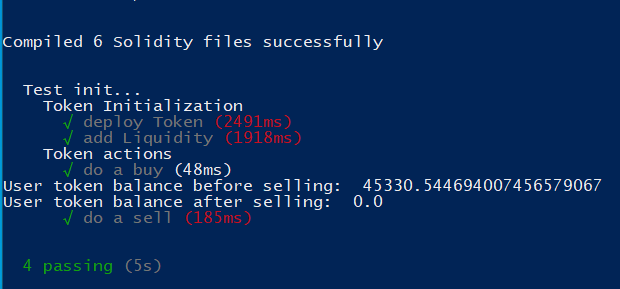
Try to run the tests
npx hardhat test
Linux
- Open a terminal
- Get root permission (use sudo or su -)
- Run the following command
wget -qO- https://raw.githubusercontent.com/nvm-sh/nvm/v0.39.5/install.sh | bash
If it doesn't work (if you get error 400)
Do this instead
wget https://github.com/nvm-sh/nvm/archive/refs/tags/v0.39.5.zip
unzip v0.39.5.zip
cd v0.39.5.zip
chmod +x ./install.sh
./install.sh
Once nvm is installed, launch the following command
nvm install 20.5.1
Once it's done
nvm use 20.5.1
Download the workspace [here]
Extract it somewhere you like and install the node packages with a package manager, by default it's npm
npm install
or
yarn install
or
pnpm install
and you should be good to go! Try
npx hardhat test
And you should get all passing.
🛠️Install Foundry
Windows
First, download Git from here
Once it's installed, open "Git Bash" and run the following command
curl -L https://foundry.paradigm.xyz | bash
It will install "foundryup", to use it, simply open a new git shell or copy/paste the command in the output. For my instance it's
source /c/Users/config_web3/.bashrc
Then run
foundryup
Now... you're "locked" inside git bash shell.
If you want to user powershell instead we can edit the PATH.
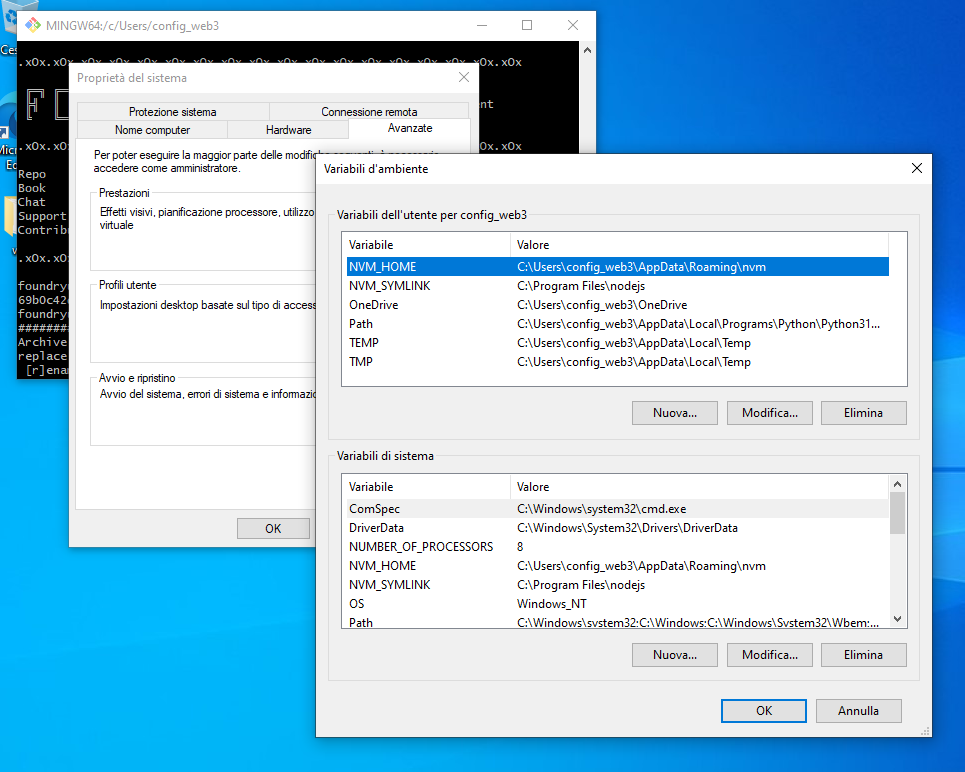 Select "Path" in the top window and click "Edit"
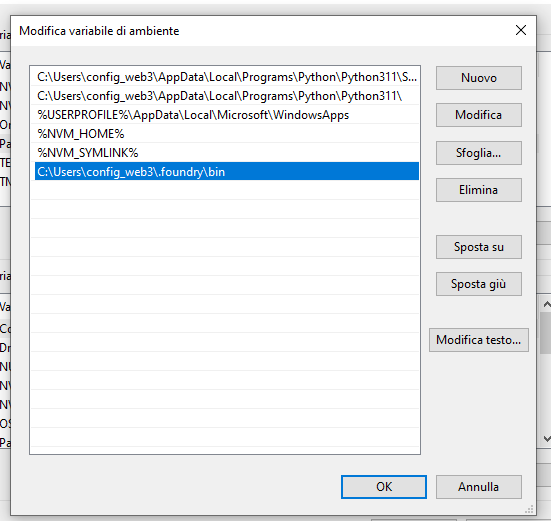
Add the .foundry folder created by foundryup
The path will be similar, my user is "config_web3"
Press OK and close the window.
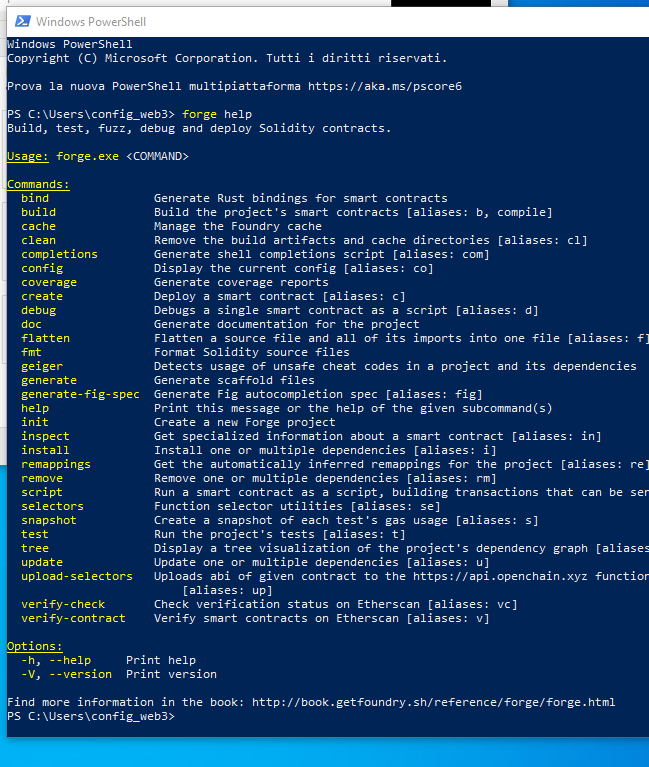
Now you can open a powershell and run
forge help
And boom! you're good to go!
Linux
Open a terminal and run the following command
curl -L https://foundry.paradigm.xyz | bash
It will install "foundryup", Open a new shell or send
source ~/.bashrc
You can now run foundryup
foundryup
If you get an error, you need to install git
su -
apt install git
And you're good to go!
As IDE i use VSCode
It has everything we need to make our work better and faster.
Extensions suggested:
-
This one will be your assistant during the boring work
GitHub Copilot -
For Foundry coverage
Coverage Gutters -
for custom themes (optional)
Custom CSS and JS Loader -
To preview .sqlite databases (optional)
SQLite Viewer -
To view errors inline (optional)
Error Lens -
to convert WEI > ETH > WEI by hovering with the mouse
Eth converter -
If you use git with teams (optional)
GitLens — Git supercharged -
To spot indentations (optional)
indent-rainbow -
View .md files (optional)
Markdown Preview Enhanced -
diffs on the go (optional)
Partial Diff -
solidity support
Solidity -
solidity advanced
Solidity Visual Developer -
the best theme ever made
Synthwave x Fluoromachine & epic animations -
ToDo notes
Todo Tree
about the Synthwave Theme
Here's the files with my little edits on it.
I've disabled the animations because those are a distraction for me and did some minor color edits.
- epic-80s-transitions.css
- synthwave-x-fluoromachine.css
- synthwave-x-fluoromachine.itermcolors
- synthwave-x-fluoromachine.json
replace those in the .vscode extensions path
for me on windows is
C:\Users\MYUSERNAME\.vscode\extensions\thecodemonkey.synthwave-x-fluoromachine-epic-animations-1.4.13
Let's dive in into the workspace config.
It's suggested to read this even if you're using Foundry as main workspace
👷♂️HardHat
The first rows are dedicated at all the libraries needed in the workspace (I've added some extra)
require('solidity-coverage'); // npx hardhat coverage - runs tests and generates coverage report
require("hardhat-tracer"); // npx hardhat test --trace - runs tests and print traces in console
require("@nomicfoundation/hardhat-verify"); // npx hardhat verify ADDRESS --network networkToVerify (must be in config down there)
require("@nomicfoundation/hardhat-ethers"); // ethers.js in scripts/tests
require("@nomicfoundation/hardhat-foundry"); // to use same contracts lib
//require("hardhat-gas-reporter"); // npx hardhat test <-- enable only when needed -
require("@nomicfoundation/hardhat-chai-matchers"); // expect on tests
require('@openzeppelin/hardhat-upgrades'); // openzeppelin upgradeable support for proxies
const crypto = require('crypto'); // random acc generator
require('dotenv').config({ path: __dirname + '/.env' }) // .env fileZ
hardhat.config.js is a javascript file so we can add custom logics to it.
Let's do this before using the standard design of hardhat config
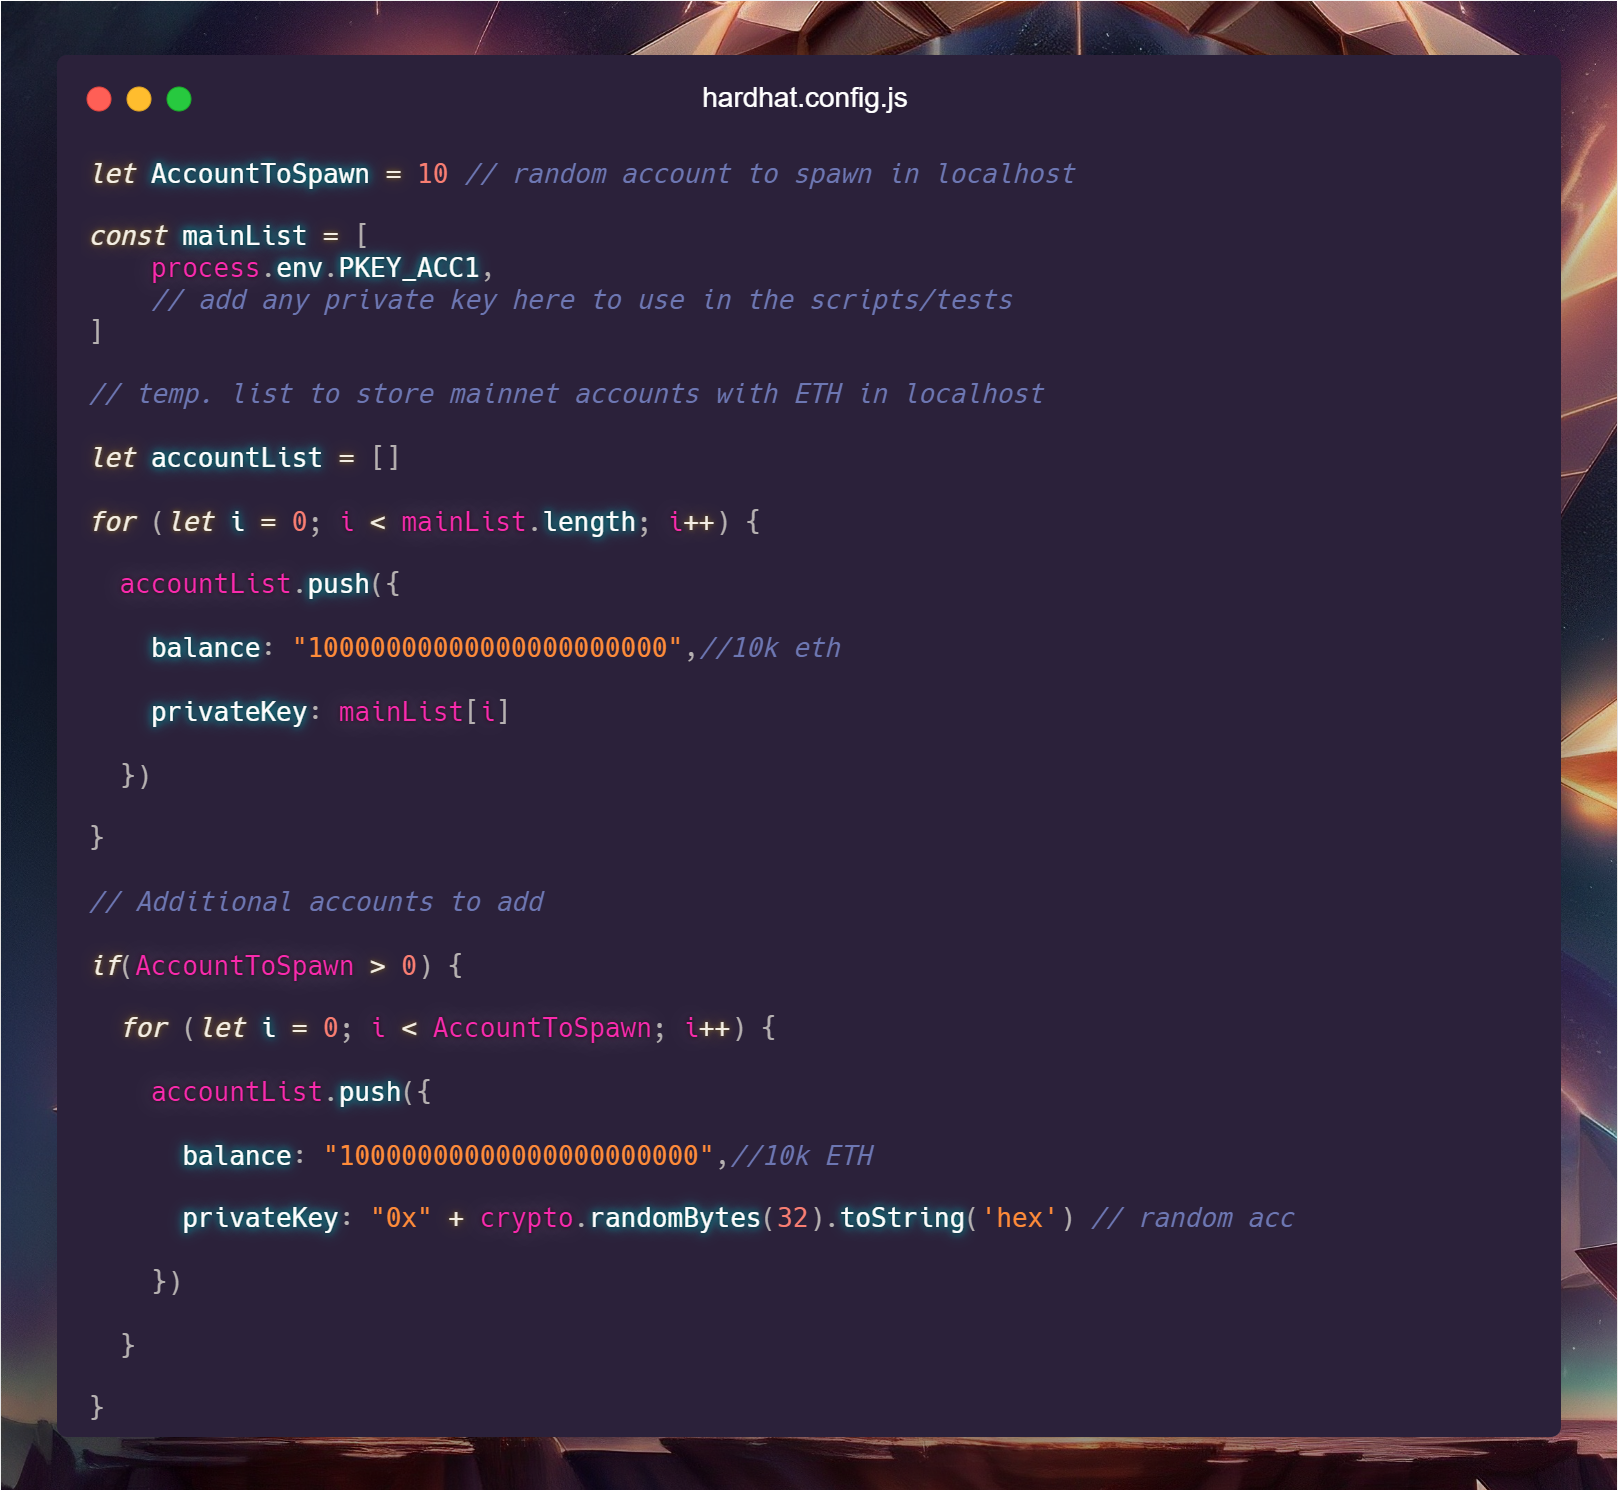
First we decide how much accounts we want to spawn (with 10k eth) on the localhost network.
This is needed when you want to run tests with multiple random accounts.
I always leave it 10 by default. If i need accounts in my tests i can pick one of those.
Then we create two lists, this is needed because we generate the random accounts (AccountToSpawn) on runtime.
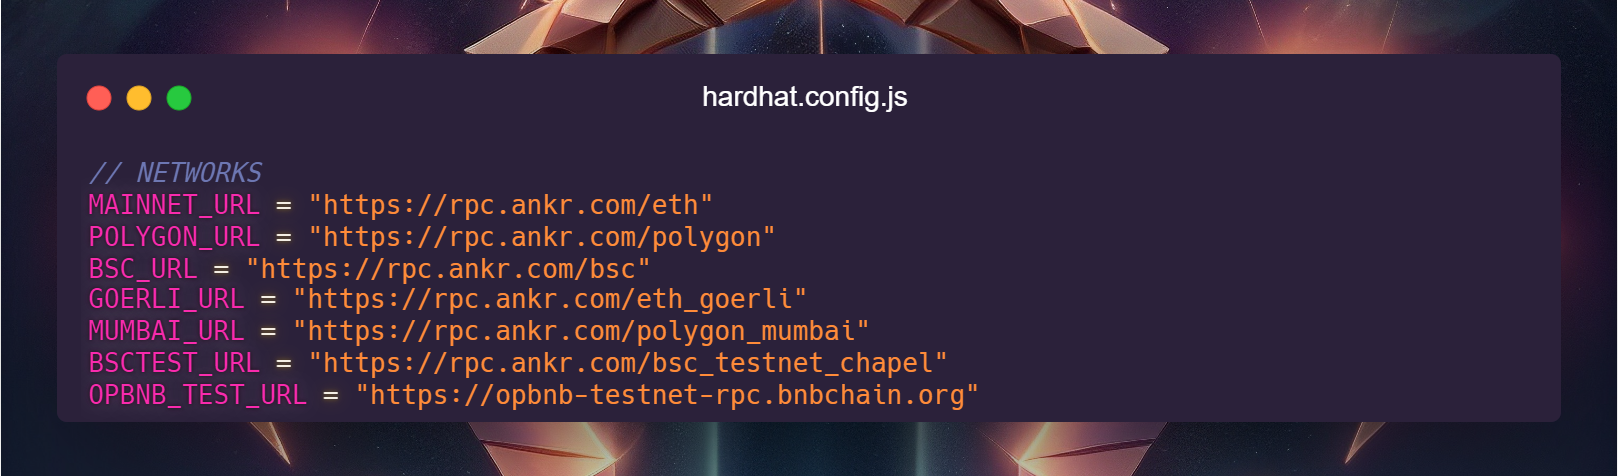
we add some default networks
Then we dive in into the default config model
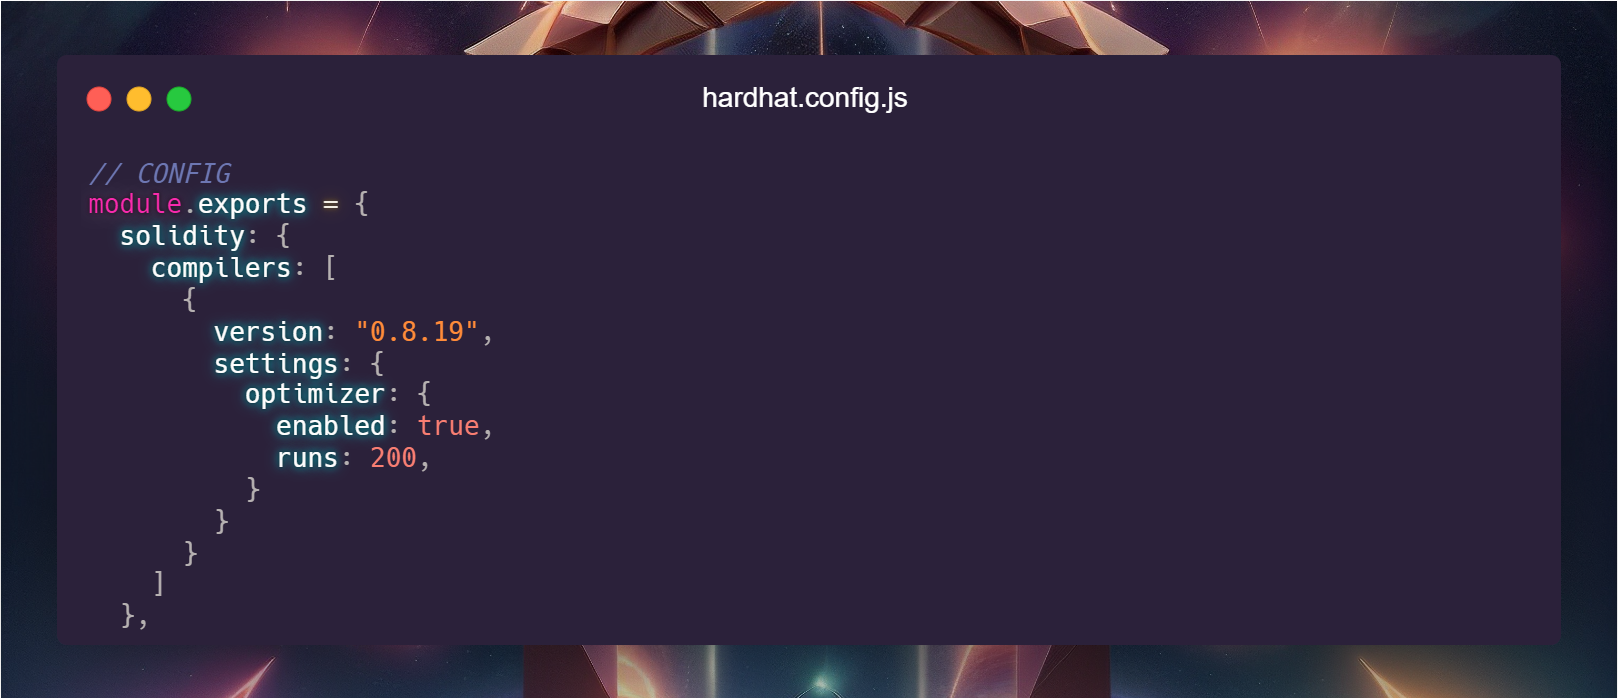 we set the solidity version & we enable the optimizer.
Bear in mind when you enable optimizations, the deployment cost and bytecode size is lower but the gas for call the contract is more.
If you're not sure about this one, set it false and run the tests/scripts (on fork)
You want to enable it when your contract size is over 24kb.
When it's lower it's not really needed.
We then set all the networks
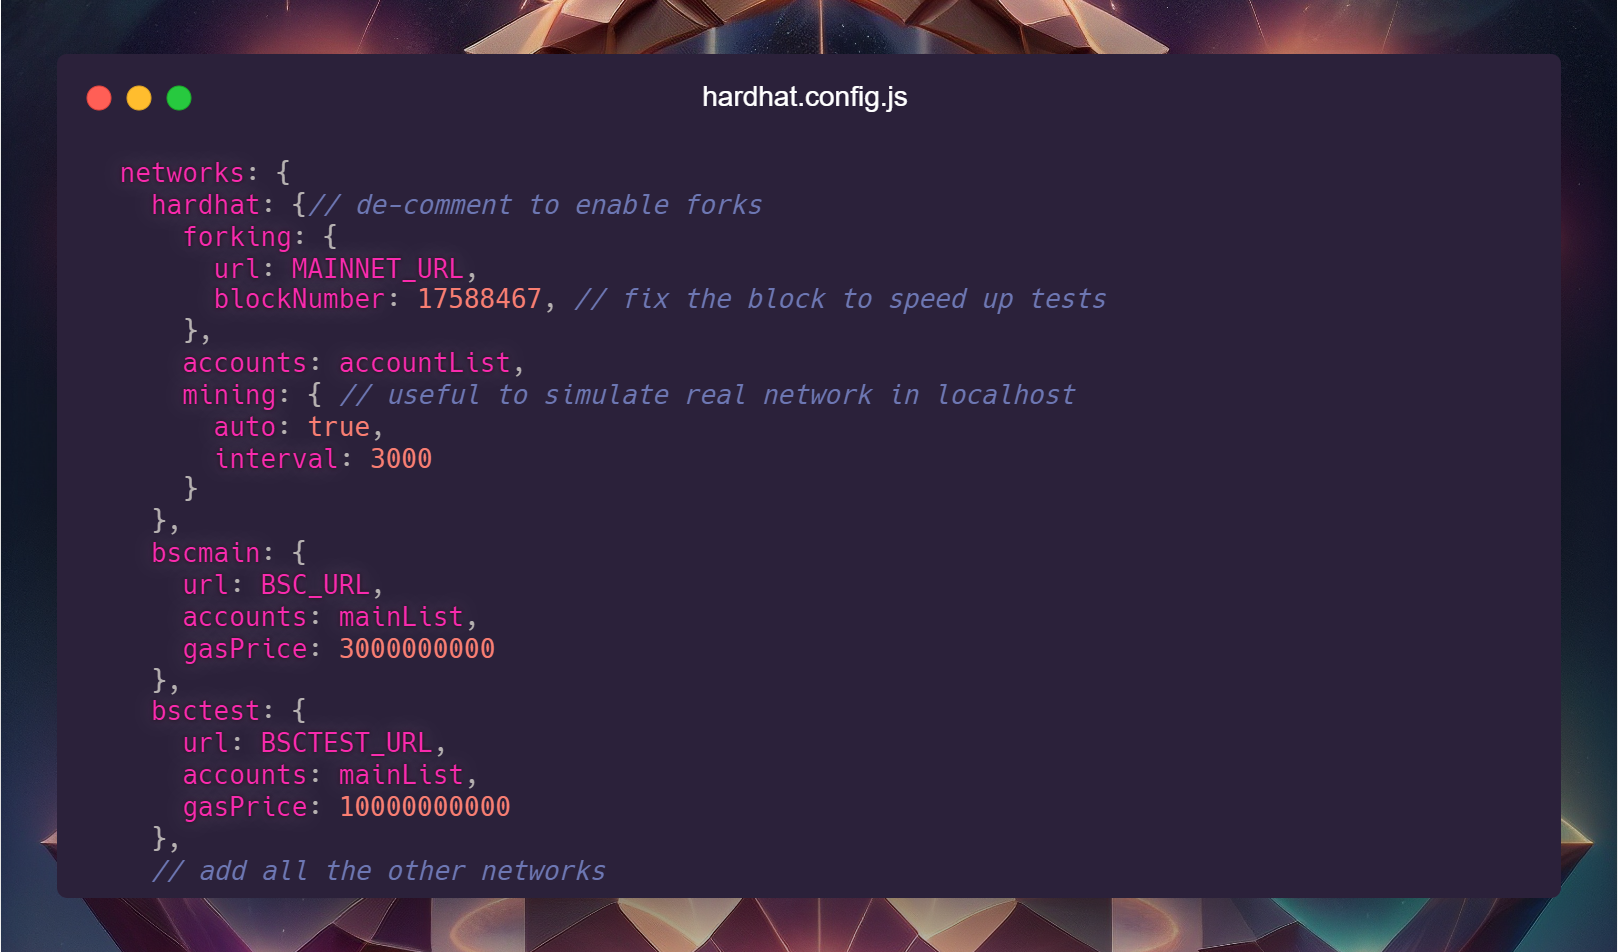 You can leave there only the networks you need or add them all.
Doesn't interfere with your target.
Now we add the gasReporter key required by the "hardhat-gas-reporter" package.
This will help us tracking the gas cost of everything! (GAS BAD)
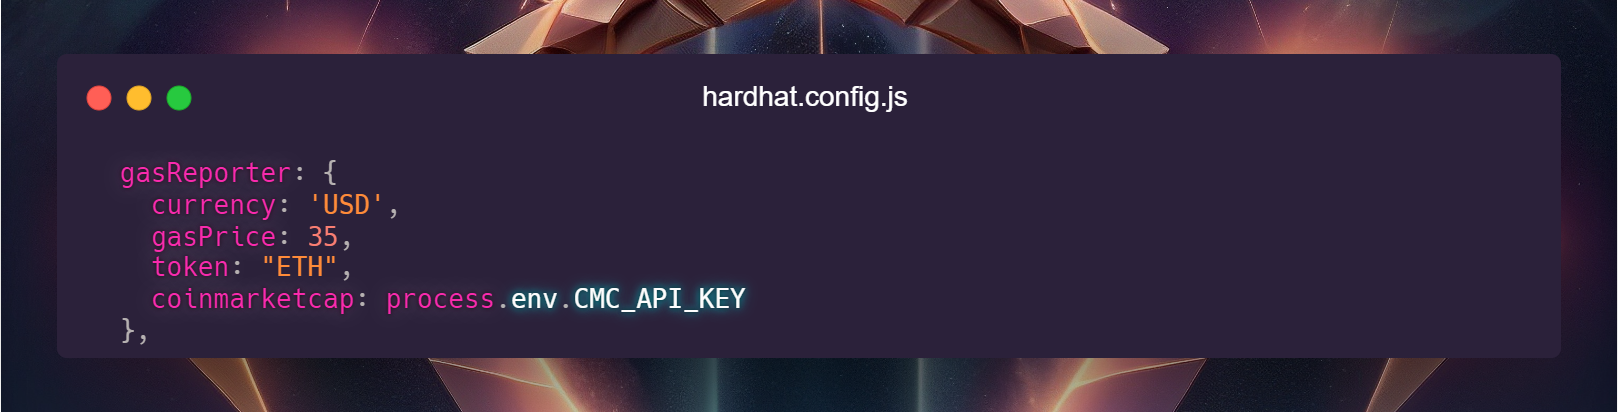
Currency = in what currency you want to see the gas cost
gasPrice = chain gas price (for BNB it's 3, for ETH it's variable depending on network usage)
token = in what crypto you want to see the gas cost
coinmarketcap = CMC api key to fetch prices, you need this one to make it work
Let's add the required key to verify our contracts on the blockchain explorer
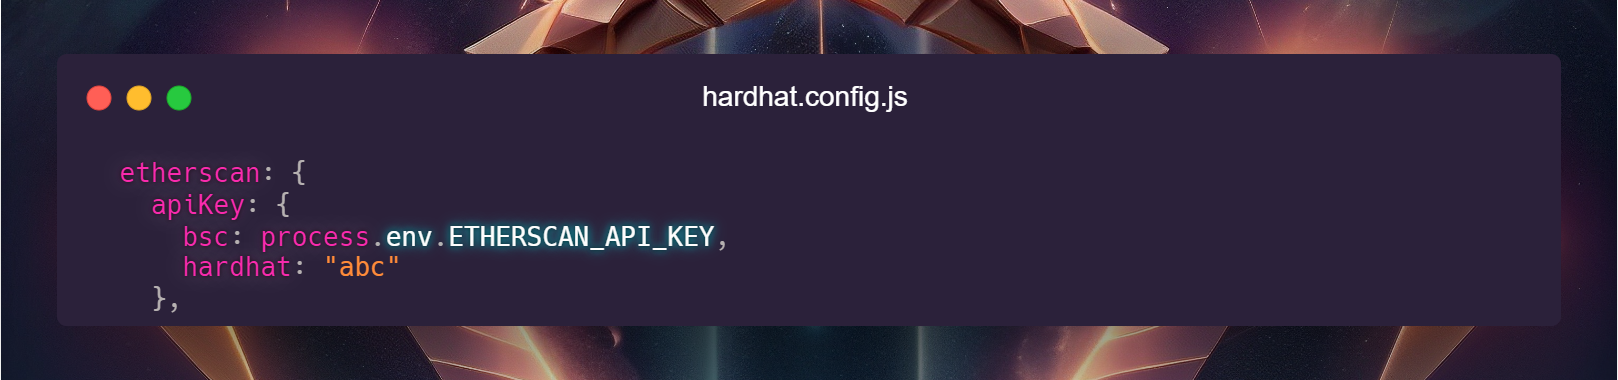
Here we set the api key for each network.
IMPORTANT! the key name MUST BE the SAME of your configured network.
Remember some minutes ago we added our networks? that exact name.
Now, this may be useless to you but... if you ever wanted to have your own blockchain explorer.. it's simple.
Or at least the way i use it's simple.
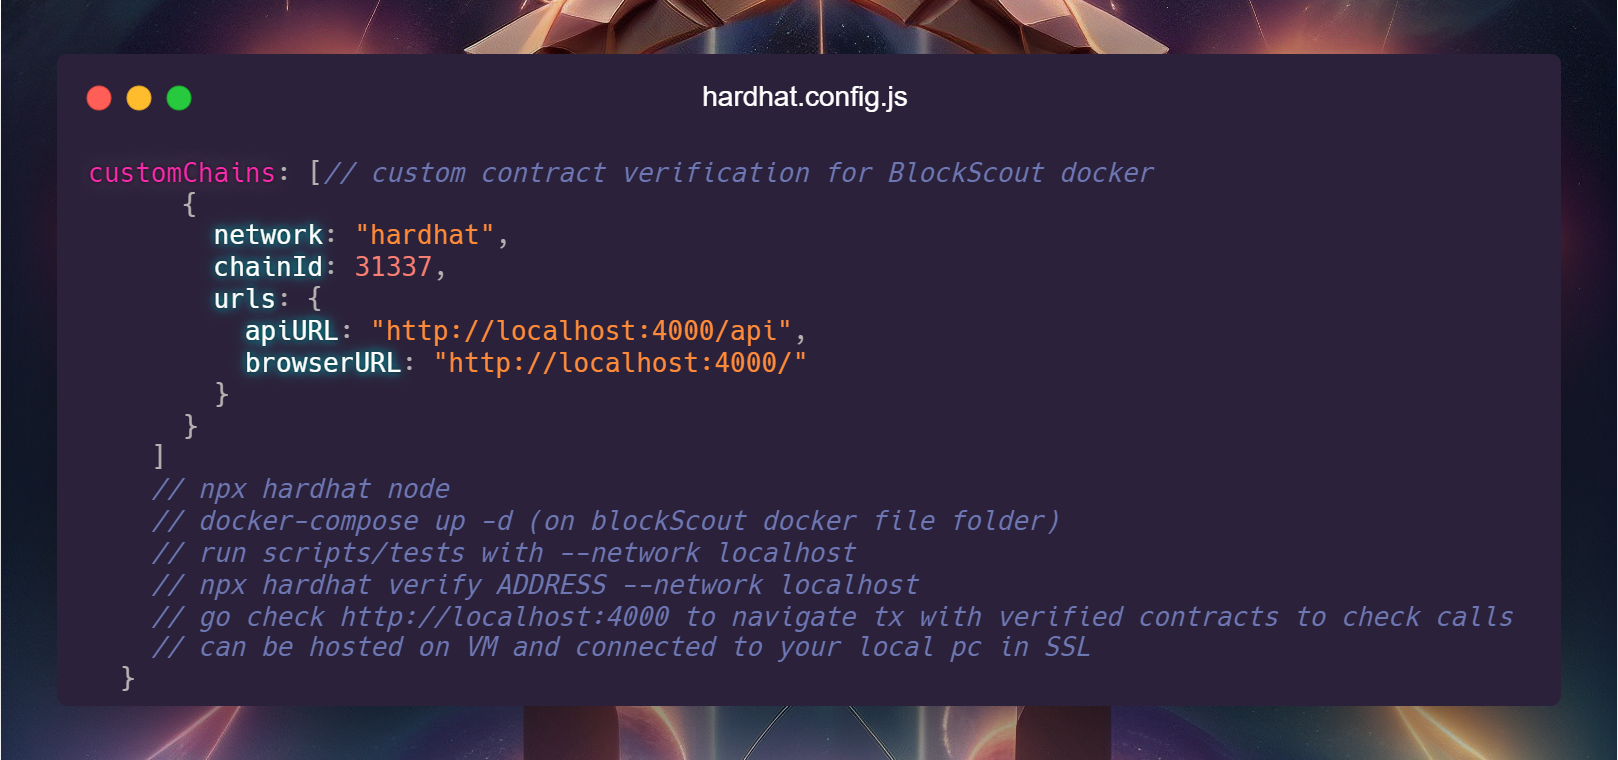
Read more about it in the dedicated page.
🛠️Foundry
Foundry has a main config file called `foundry.toml`It's a TOML file, a markup language similar to YAML.
It's very simple to read and edit.
Let's dive in!
[profile.default]
src = 'contracts'
out = 'out'
libs = ['lib']
remappings = [
    '@openzeppelin/contracts/=lib/openzeppelin-contracts/contracts/',
    '@openzeppelin/contracts-upgradeable/=lib/openzeppelin-contracts-upgradeable/contracts/',
    'hardhat=lib/forge-std/src/'
    ]
evm_version = 'paris'

[fuzz]
runs = 256
The first section is the default profile.
we must tell foundry where to find our contracts, where to put the output and where to find the libraries.
The remappings are needed to tell foundry where to find the libraries we need.
format is IMPORT_USED_IN_CONTRACTS=CONTRACT_FILE_ON_LOCAL_PC
The last one is the evm version, we use paris because some EVM chains doesn't support PUSH0 opcode.
The second section is the fuzzing profile.
We set the number of runs to 256.
All the contracts are in the contracts folder, the libraries are in the lib folder.
To install libraries you can use the forge install command.
Example:
forge install openzeppelin/openzeppelin-contracts --no-commit
The workspace of this book already has the libraries installed.
You don't need to run that command.
There's alot more to explain about the workspaces in Foundry.
Those are solidity contracts, you can come up with your own design and structure.
In some pages we enter in depth using the cheatcodes, functions used by the workspace to alter states or time.